
Master AutoCAD Dynamic Input in 15 Minutes for Drafters, Practice Tips
- Steve Fagan

- 5 days ago
- 12 min read

Dynamic Input is the tooltip interface that follows your cursor in AutoCAD, letting you enter coordinates, distances, and command options without looking away from your drawing. Turn it on or off instantly with F12, the Dynamic Input icon on the status bar, or the DYNMODE system variable, which also controls exactly which of its three components are active.
TL;DR:
Setting DYNMODE to a negative value disables Dynamic Input completely while preserving customized preferences, enabling quick switches between detailed and minimalist views.
Use F12 for rapid toggling of Dynamic Input during drawing, or set DYNMODE to 0 to turn the feature off when necessary for performance or clarity.
Dimension input overrides pointer input after placing the first point, which can be managed by typing a comma or angle symbol to re-enable coordinate entry.
Most issues with missing icons or unexpected behavior can be fixed with simple menu adjustments or keystrokes, avoiding the need to disable Dynamic Input permanently.
Customizing pointer format and visibility settings in DSETTINGS allows tailoring the interface for specialized tasks like site planning or mechanical drafting.
Table of Contents
How to Turn Dynamic Input On and Off in AutoCAD
Getting AutoCAD dynamic input working the way you want takes about ten seconds once you know where to look. There are three ways in, and each suits a different situation.
Press F12. This is the fastest method and works as a full toggle. Hold it down mid-command for a temporary override. Release, and your previous setting returns.
Click the Dynamic Input button on the status bar. It looks like a small cursor icon with a tooltip beside it. If you don’t see it, click the three-line customization menu at the far right of the status bar and check “Dynamic Input” to add it back.
Type DYNMODE and set a value. According to Autodesk’s support documentation, 0 turns everything off, while 1, 2, and 3 enable different combinations of pointer input and dimension input. Most drafters leave it at the default value of 3, which runs both.
DYNMODE is the setting to reach for when F12 isn’t behaving as expected, since it overrides whatever the status-bar icon shows.
Pointer Input, Dimension Input, and Dynamic Prompts Explained
Dynamic Input isn’t one feature. It’s three, and knowing which one is talking to you at any given moment saves a lot of confused clicking.
Pointer input shows your crosshair’s coordinates in a small tooltip and lets you type X,Y values directly at the cursor instead of at the command line.
Dimension input displays live distance and angle values once you’ve placed a first point, and it takes over from pointer input for that second-point prompt.
Dynamic prompts show the current command’s options right next to the cursor. Press the down arrow to cycle through choices, and AutoComplete still works inside these tooltips just as it does on the command line.
Autodesk’s documentation on Dynamic Input tooltips frames all three as a single context-sensitive interface designed to keep your eyes on the drawing area rather than bouncing to the command window. In practice, once you place a first point in most commands, dimension input quietly steps in front of pointer input. That’s expected behavior, not a bug, though it trips up a lot of new users.
Where to Configure Dynamic Input Settings in AutoCAD
Type DSETTINGS and open the Dynamic Input tab to control exactly which pieces of this interface show up and when. This is where the AutoCAD input settings that matter most actually live.
Checkboxes let you enable or disable Pointer Input, Dimension Input, and Dynamic Prompts independently.
The DYNPIVIS variable controls when pointer tooltips appear, either always during a command or only when you start typing.
DYNPROMPT and DYNINFOTIPS govern whether command prompts and supplemental tooltips display at all, which matters if you find the on-screen text distracting during detailed work.
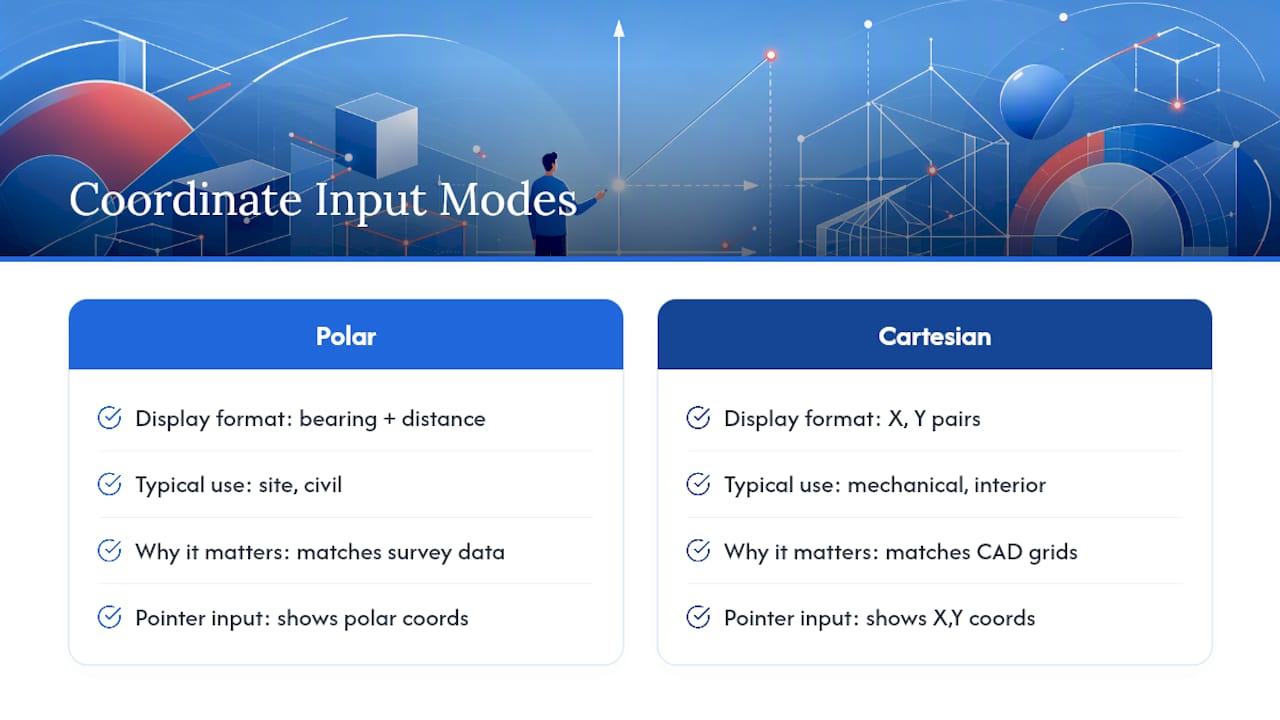
The Dynamic Input tab in the Drafting Settings dialog box is also where you’ll find pointer format options, letting you switch between polar and Cartesian coordinate display depending on the type of drafting you do.
One setting worth knowing about that most tutorials skip: setting DYNMODE to a negative value disables Dynamic Input entirely while preserving every custom setting you’ve configured. Flip it back to positive later and everything returns exactly as you left it. This beats reconfiguring from scratch every time a specific drawing calls for the command line instead.
Pro Tip: If you’re bouncing between a detail-heavy sheet where tooltips get in the way and a rough layout where speed matters more, use a negative DYNMODE value as your “off switch” rather than unchecking every box in DSETTINGS. It’s one variable to flip back, not five settings to remember.
Fixing Common Dynamic Input Problems
Most complaints about Dynamic Input trace back to three fixable situations.
The icon is missing from the status bar. Click the three-line customization menu at the bottom right of the AutoCAD window and select “Dynamic Input” from the list to bring it back. This happens most often after a workspace reset or a fresh install.
Dimension input keeps overriding pointer input when you need coordinates instead. This is expected once a command has a first point. Force pointer input back by typing a comma before your coordinates, or use the “<” symbol to enter an absolute angle.
You need command history or an error message but don’t want to give up Dynamic Input. Press F2 to open the AutoCAD command line as a separate scrollback window rather than disabling Dynamic Input to see what happened three steps ago.
None of these require turning the feature off permanently. They’re all one keystroke or one menu click away from a fix, which is worth remembering before you go digging through options dialogs.
Tips for Working With Dynamic Input Every Day
A few habits separate drafters who fight Dynamic Input from those who barely notice it’s there.
Set dynamic prompts to display “When I type” rather than constantly, so the drawing area stays clean until you actually need to enter a value.
Hold F12 as a temporary override while placing complex geometry, like hatch boundaries or tight polyline vertices, so tooltips don’t cover the exact point you’re trying to click.
Keep the command window undocked or set to auto-hide, and use F2 when you specifically need scrollback. Autodesk itself recommends this pairing: Dynamic Input for active sketching, the command line for review.
Build a habit deliberately. Open a blank practice file and toggle DYNMODE and DSETTINGS options one at a time while drawing simple lines and circles, so you know what each setting looks like before you need it on a real project.
Pro Tip: Muscle memory beats memorizing a settings dialog. Spend fifteen minutes in a throwaway file switching between DYNMODE values while drawing the same rectangle five times. You’ll recognize each mode on sight after that, which saves far more time than reading about it does.
Dynamic Input Quick Reference
Bookmark this for the keys and variables you’ll actually reach for.
F12 — toggles Dynamic Input; hold during a command for a temporary override.
F2 — shows or hides the command line history window.
DYNMODE — 0 disables, 1 through 3 enable different pointer/dimension combinations, negative values disable while preserving settings.
DYNPIVIS — controls when pointer tooltips display.
DYNPROMPT / DYNINFOTIPS — control prompt and supplemental tip visibility.
DSETTINGS → Dynamic Input tab — the full configuration panel; also reachable by right-clicking the status-bar icon and choosing Settings.
Four variables and one dialog box cover nearly every adjustment you’ll ever need to make, which is a small footprint for a feature that governs how you interact with every single command.
When to Use Dynamic Input Instead of the Command Line
Dynamic Input works best for active sketching. The command line still earns its keep for anything involving history, review, or complex scripted input.
If you’re placing walls, drawing polylines, or trimming geometry, Dynamic Input keeps your eyes on the drawing and cuts the back-and-forth glance to the bottom of the screen. That’s the entire point of the feature, and it’s why Autodesk built pointer input and dimension input around the cursor rather than a fixed location.
The command line earns its keep in different moments. Reviewing what happened three commands ago, reading a full error message, or running a script with multiple parameters is faster with a visible, scrollable command history than with a tooltip that vanishes the second you move the cursor. Long LISP routines or batch operations also tend to generate output too dense for a floating tooltip to hold usefully.
The practical rule most experienced drafters settle into: leave Dynamic Input on as the default, and reach for F2 to check history only when something needs a closer look. You’re not choosing one system over the other permanently. You’re switching contexts for a few seconds at a time, and F12 plus F2 together make that switch nearly frictionless.
New users sometimes treat this as an either/or decision and turn Dynamic Input off entirely because the command line feels more “professional.” It isn’t a maturity marker. It’s a different tool for a different moment, and the fastest drafters use both without thinking about it.
Dynamic Input, Grips, and Command Aliases Working Together
Dynamic Input doesn’t operate in isolation. It layers directly on top of two features you’re probably already using: grip editing and command aliases.
Grab a grip on a line or polyline vertex, and Dynamic Input immediately shows a distance and angle tooltip right where you’re dragging, functioning exactly like dimension input during a fresh command. Stretch a wall segment, and the tooltip tells you the new length in real time rather than forcing you to check the Properties palette afterward. This grip integration is arguably where Dynamic Input delivers its biggest speed gain, since editing existing geometry happens constantly during any real drafting session.

Command aliases interact just as smoothly. Type “L” for LINE or “PL” for POLYLINE, and dynamic prompts appear at the cursor the instant AutoCAD recognizes the alias, no different from typing the full command name. If you’ve customized aliases in the PGP file, those custom shortcuts trigger the same tooltip behavior automatically. There’s no separate configuration needed to make aliases play nicely with Dynamic Input.
One detail worth knowing: some AutoLISP routines and third-party commands don’t fully support dynamic prompts and will fall back to the command line for their input regardless of your DYNMODE setting. That’s a limitation of the routine, not something you can fix through DSETTINGS.
Does Dynamic Input Slow Down AutoCAD?
Short answer: not meaningfully, on any machine built in the last several years. Dynamic Input is a lightweight UI layer, not a computational feature, so it doesn’t touch your graphics card or processor the way rendering or large external references do.
Where performance conversations actually belong is dynamic block behavior, which sometimes gets confused with Dynamic Input because of the similar name. Dynamic blocks with many parameters and complex constraint tables can genuinely slow a drawing down as file size and block count grow, but that’s a separate system from the cursor tooltips this article covers.
If you notice lag specifically when Dynamic Input tooltips appear, the more likely culprits are an outdated graphics driver or a drawing with an unusually high number of open dynamic blocks. Disabling Dynamic Input to test for a performance fix rarely solves anything, and it costs you the workflow speed the feature is designed to add. Update your graphics driver first, check the drawing’s block count second, and leave Dynamic Input running throughout the diagnosis.
Real Drafting Scenarios Where Dynamic Input Pays Off
Dynamic Input earns its reputation in specific, repeatable moments rather than as a blanket productivity boost.
Drawing a wall at a precise length and angle in a floor plan is the clearest case. Type the length, press Tab to jump to the angle field, type the angle, and hit Enter. No command-line typing, no glancing away from the wall you’re actually placing.
Trimming or extending a series of objects benefits too, since dynamic prompts show your remaining command options (Fence, Crossing, Undo) right at the cursor instead of requiring a scan of the command line to remember what’s available. Placing a circle by radius versus diameter is another small but constant win: the prompt option sits inches from your cursor rather than several inches lower on the screen.
Annotation and dimensioning workflows lean on pointer input heavily, since placing a dimension line accurately often comes down to typing an exact offset distance the moment you see it displayed at the cursor. For anyone drafting detailed floor plans or mechanical parts for long stretches, that repeated small saving across hundreds of clicks adds up to real time by the end of a session. Readers building foundational skills in either direction will find the complete guide to getting started with AutoCAD covers how these interface choices fit into the bigger picture of the software.
Where Dynamic Input Falls Short
Dynamic Input isn’t a universal upgrade over the command line, and treating it as one leads to some avoidable frustration.
Complex commands with many sequential options can produce cluttered, hard-to-read tooltips, especially at smaller screen resolutions or on a second monitor set to a lower DPI. Some users find dynamic prompts genuinely harder to parse than the same options laid out horizontally along the bottom of the screen. There’s no universally “correct” answer here. It comes down to personal reading preference and screen setup.
Scripted operations and certain AutoLISP routines, as mentioned earlier, bypass dynamic prompts and fall back to the command line regardless of your settings, which means you can’t rely on Dynamic Input consistently across every custom tool in your workflow. If your office runs heavy customization, expect some commands to behave differently than others.
The most common pitfall is simpler than any of that: leaving dimension input on with a tooltip position that hides the exact point you’re trying to snap to, then blaming a misplaced object on the software rather than the tooltip covering the crosshair. Toggling F12 as a temporary override during that exact moment fixes it instantly, but only if you remember it’s there. For a broader look at avoidable errors like this one, the common AutoCAD drafting mistakes guide is worth a read alongside this one.
Customizing Dynamic Input for Advanced Workflows
Once the basics are second nature, a few less obvious settings let you tailor Dynamic Input to specialized work rather than accepting the defaults.
Switching pointer input’s coordinate format between polar and Cartesian in DSETTINGS matters more than it seems for site plans versus mechanical parts. Civil and site work tends to favor polar coordinates since bearings and distances are how the underlying survey data is described, while mechanical and interior drafting often reads more naturally in Cartesian X,Y pairs.
Adjusting DYNPIVIS to show pointer tooltips only “when I type” rather than constantly is the single biggest change for reducing visual noise during long sessions, and it’s the setting Autodesk’s own guidance on the Dynamic Input tab points to for exactly this reason.
For teams standardizing settings across multiple workstations, DYNMODE and its companion variables can be set in a CAD standard or startup script so every machine in the office opens with identical Dynamic Input behavior, which matters more than it sounds like once you’re troubleshooting a drawing that “looks different” on a colleague’s screen. If you’re also reviewing drawings outside AutoCAD itself, a lightweight tool like CADViewer can be useful for quick checks without opening the full application. None of this replaces learning the fundamentals first. Readers still building that foundation will get more mileage from structured AutoCAD training than from advanced variable tweaking before the basics are solid.
Master Dynamic Input Alongside the Rest of AutoCAD
If you’ve made it this far, you already understand more about Dynamic Input than most drafters who’ve used AutoCAD for years without ever opening DSETTINGS. That gap between “it works” and “I control exactly how it works” is where real drafting speed comes from, and it’s worth closing early rather than picking up bad habits that get harder to unlearn later.
S15Studio’s Mastering AutoCAD course builds this kind of interface fluency directly into project-based lessons, so you’re not memorizing system variables in isolation but using them the way you would on an actual job. For readers working across both platforms, the Complete Revit and AutoCAD Training bundle pairs this level of AutoCAD detail with Revit fundamentals and exam preparation, with lifetime access to materials and direct trainer support built in.
What Most Tutorials Get Wrong About Dynamic Input
Most guides treat Dynamic Input as a beginner topic. Turn it on, here’s what pointer input looks like, done. That framing undersells the feature badly.
The real skill isn’t knowing that F12 exists. It’s knowing when dimension input is about to override your pointer input and having the comma-key fix ready before it costs you a misplaced point. It’s setting DYNPIVIS to “when I type” before your third hour of detailing, not after your eyes are tired of tooltips crowding the crosshair. Advanced AutoCAD users don’t use Dynamic Input more than beginners. They configure it more deliberately, and that’s the entire gap this guide is meant to close.
The conventional advice to “just leave the defaults” isn’t wrong exactly, but it leaves real speed on the table. DYNMODE’s negative-value trick alone saves a genuine amount of reconfiguration time for anyone bouncing between drawing types, and almost nobody discovers it without being told. If you take one thing from this guide, make it that: spend the ten minutes in DSETTINGS now, before a deadline forces you to fight the interface instead of using it.
— Steve
Sources
Recommended
Comments