
AutoCAD Groups vs Blocks: Quick Rules for Drafters


Use Blocks when you need to reuse geometry across drawings, attach metadata, or keep file size under control. Use Groups when you want to move or edit a temporary collection of objects within a single drawing without committing to a formal definition. The fundamental difference is this: a Block is a named definition stored in the drawing’s block table, and every instance you place links back to it. A Group is just a saved selection set — each copy is completely independent, and editing one member has no effect on anything else.
Quick decision rules:
Reuse, attributes, or cross-drawing sharing? Make it a Block.
Fast, flexible selection within one drawing? Use a Group.
Unsure? Start with a Group during early design, then convert to a Block once the geometry stabilizes.
Pro Tip: If you find yourself copying a Group to multiple locations and wishing changes would propagate, that’s your signal to convert it to a Block immediately.
Table of Contents
What exactly is a Block in AutoCAD?
A Block is a named object definition stored in the drawing’s block table. When you place a Block, you’re inserting a reference to that definition, not a copy of the geometry itself. Change the definition, and every reference in the drawing updates automatically. That propagation behavior is what makes Blocks the right tool for anything you’ll place more than once.
The AUGI community thread on groups vs blocks puts it plainly: redefine a Block and all instances update; Groups have no equivalent mechanism.
What exactly is a Group in AutoCAD?
A Group is a saved selection set — a named collection of objects that behave as a unit for selection and common operations but without creating any linked definition. Select one member, and AutoCAD selects the whole group. The objects themselves remain fully editable as individuals; you don’t need to explode anything to modify a member.
Groups live only in the drawing where they were created. There’s no mechanism to export a group definition to another file the way WBLOCK handles blocks.
Core Group commands
Group Manager — (accessible via the GROUP command dialog): lists all groups in the drawing and lets you toggle selectability on or off per group.
One practical limit worth knowing: Autodesk’s documentation warns that groups containing very large numbers of objects can degrade AutoCAD performance. If you’re grouping hundreds or thousands of entities, consider whether a Block or an Xref is a better structural choice.
Pro Tip: The system variable PICKSTYLE controls whether clicking a group member selects the whole group (PICKSTYLE = 1) or just that object (PICKSTYLE = 0). Toggle it to 0 when you need to grab individual members for fine edits, then set it back to 1 when you’re done. No ungrouping required.
How do Groups and Blocks compare side by side?
Dimension | Block | Group |
Definition & behavior | Named definition in block table; instances link back to it | Saved selection set; no shared definition |
How edits propagate | Redefine the block → all instances update | Edit one member → no effect on other groups |
Attributes / metadata | Full support via ATTDEF/ATTRIB; extractable with DATAEXTRACTION | No attribute support |
Transferability | Reusable across drawings via INSERT, WBLOCK, Blocks palette | Local to the current drawing only |
Typical use-cases | Doors, windows, fixtures, title blocks, symbols, schedules | Temporary assemblies, early-stage layouts, grouped site elements |
Commands & editing | BLOCK, INSERT, BEDIT, REFEDIT, WBLOCK, PURGE | GROUP, GROUPEDIT, UNGROUP, PICKSTYLE |
Advantages | Reuse, propagation, attributes, file-size efficiency | Fast to create, flexible membership, no insertion point needed |
Limitations | Requires planning (name, insertion point); accidental redefinition risk | No cross-drawing reuse; performance risk with very large groups |
The single most important difference to internalize: Blocks are definitions; Groups are selections. Everything else in the table follows from that. CanadaCAD’s comparison reinforces this transferability gap — blocks travel between drawings, groups do not.
When should you use Blocks vs Groups?
The decision usually comes down to three questions: Will this geometry appear more than once? Will it need data attached? Will it leave this drawing?
Use Blocks when:
You’re placing repeating elements — doors, windows, electrical outlets, furniture symbols.
The element needs attributes for schedules or procurement (part numbers, specs, quantities).
You want to share the geometry with other drawings or a team library.
File size matters and you have many instances of the same geometry.
Use Groups when:
You’re in early design and the geometry is still changing shape frequently.
You need to move or copy a temporary cluster of objects without formalizing them.
Individual members need frequent edits and you don’t want to open a Block Editor every time.
The assembly is unique to this drawing and will never be reused.
Three worked examples
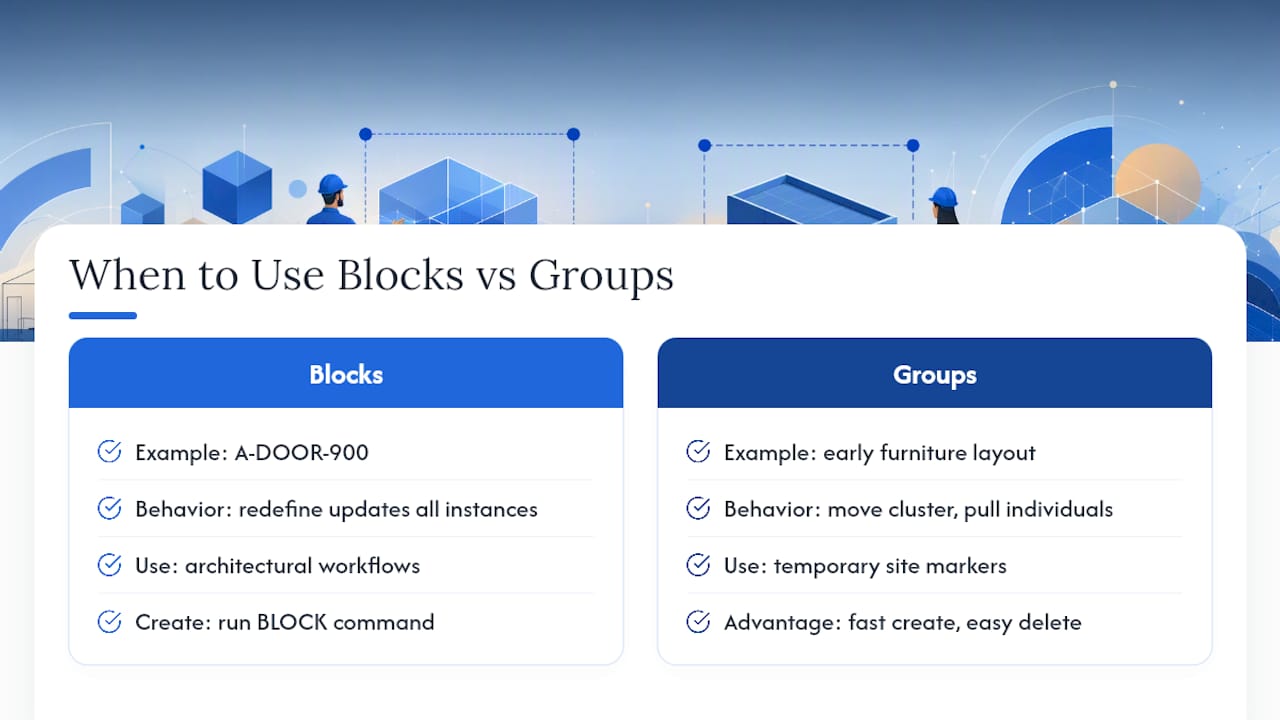
Architectural door symbol. You’re laying out a floor plan with multiple doors. Make it a Block. Name it “A-DOOR-900” with an attribute for door type. When the spec changes, you redefine the block once and all instances update. For AutoCAD architectural workflows, this is standard practice.
Early-stage furniture layout. You’re sketching a conference room arrangement and trying three different table configurations. Group the chairs around each table option. You can move the whole cluster, swap positions, and pull individual chairs out for adjustment without any formal block infrastructure. Once the client approves a layout, that’s the moment to convert.
Temporary site markers. You’re dropping reference markers on a site plan that will be deleted before issue. Groups work perfectly here — fast to create, easy to select and delete as a unit, and there’s no block definition left behind to clutter the block table.
The group-first, block-later workflow is one of the most practical habits you can build. Start complex assemblies as groups during iteration. When the geometry stabilizes, select the group and run the BLOCK command to formalize it. You get the flexibility of groups early and the power of blocks when it counts. Experienced users consistently follow this pattern for exactly this reason.
Pro Tip: When you convert a group to a block, double-check the insertion point before confirming. A poorly placed insertion point makes the block awkward to place and rotate later, especially for door swings or equipment that needs to snap to a specific corner.
How do you convert between Groups and Blocks?
Converting a Group to a Block is straightforward, but a few steps prevent the common mistakes.
Converting a group to a block
Select the group by clicking any member (PICKSTYLE must be 1 so the whole group selects).
Type BLOCK and press Enter to open the Block Definition dialog.
Enter a unique, descriptive name following your office naming convention.
Click Pick Point and snap to the logical insertion point (corner, center, or connection point).
Under “Objects,” confirm the group’s objects are listed; choose whether to retain, convert, or delete the source objects.
Click OK. AutoCAD creates the block definition and replaces the selection with a block reference.
Run WBLOCK if you need to export the new block to a shared library file.
Editing workflows: BEDIT vs GROUPEDIT
BEDIT opens the Block Editor — a separate editing environment where changes apply to the block definition and propagate to all instances on exit. Use it for any edit that should affect every reference in the drawing.
GROUPEDIT modifies group membership (add/remove objects) without touching geometry. It doesn’t have an equivalent propagation mechanism.
REFEDIT lets you edit a block reference in the drawing context, which feels more natural but carries a risk: it’s easy to accidentally redefine a block you didn’t intend to change if multiple block names are nested.
Naming collisions are the most common source of accidental global redefinitions. If you insert a block from an external file and the drawing already contains a block with the same name, AutoCAD uses the existing definition — silently. Always check the block table (type -INSERT and list available names) before importing from external sources, and rename incoming blocks when there’s any doubt.
Common gotchas and how to fix them
Groups and blocks each have failure modes that trip up even experienced drafters.
Groups not selecting as a unit. The most common cause is PICKSTYLE set to 0. Type PICKSTYLE at the command line and set it to 1. If groups still won’t select, open the Group Manager and confirm the group’s selectability is enabled. ZWSOFT’s troubleshooting guide covers additional system-variable causes for group selection failures.
Unexpected block redefinition. If all instances of a block changed when you only meant to edit one, you likely used BEDIT or REFEDIT on the wrong block. Use CTRL+Z immediately, then use REFEDIT carefully, or copy the block, rename it, and edit the copy instead.
Performance slowdown with large groups. Autodesk explicitly warns about performance degradation when groups contain very large numbers of objects. Break oversized groups into smaller named groups, or restructure the content as blocks.
Bloated file size from unused block definitions. Deleted block references leave their definitions in the block table. Run PURGE (or PURGE All) before sharing a drawing. Groups don’t create block table entries, so PURGE doesn’t help with group-related clutter.
Pre-sharing checklist:
Run PURGE to remove unused block definitions and other named objects.
Confirm PICKSTYLE is set to your office standard before handing off.
Use SELECTSIMILAR to find all instances of a block and verify they’re consistent.
Check the PROPERTIES palette on any suspicious object to confirm whether it’s a block reference or an ungrouped object.
Pro Tip: Type -INSERT ? (with the hyphen prefix) at the command line to list every block definition currently in the drawing. It’s the fastest way to spot name collisions or leftover definitions before they cause problems.
Why Blocks are better for information-rich elements
Groups are organizational. Blocks can carry data. That distinction matters most when your drawing needs to feed a schedule, a bill of materials, or a procurement list.
ATTDEF (Attribute Definition) creates a tagged text field inside a block definition. Each field has a tag name, a prompt, and a default value. When you insert the block, AutoCAD prompts for the attribute values — or you can set them silently with preset values. Common attributes include part number, manufacturer, model, finish, and quantity.
Attribute and data extraction workflow
Open the Block Editor (BEDIT) for the target block.
On the Block Editor ribbon, click Define Attribute (or type ATTDEF).
Set the tag (e.g., “PART-NO”), the prompt (“Enter part number:”), and a default value.
Position the attribute text within the block geometry and click OK.
Save and close the Block Editor.
Place block instances and fill in attribute values as prompted.
Type DATAEXTRACTION to launch the Data Extraction wizard. Select the blocks and attributes to export, then output to a table in the drawing or to an external spreadsheet.
The FIELD command can also reference attribute values dynamically in annotation, so a title block field can pull the current revision number directly from a block attribute. Industry practice consistently favors blocks for information-heavy objects because of exactly this pipeline. When downstream users read drawings for fabrication or quantities, structured block attributes make that process significantly faster.
Pro Tip: Keep attribute tag names consistent across all blocks in a project. DATAEXTRACTION maps columns by tag name, so “PART-NO” and “PARTNO” will appear as two separate columns. Agree on a tag naming standard at project start and document it in your CAD standards file.
Key Takeaways
Blocks are the right default for anything repeatable or data-bearing; Groups are the right tool for temporary, single-drawing selection convenience.
Point | Details |
Blocks update all instances | Redefine a block once and every reference in the drawing reflects the change automatically. |
Groups stay local | Groups exist only in the drawing where they were created and cannot be exported to a shared library. |
Only Blocks carry attributes | Use ATTDEF and DATAEXTRACTION with blocks to feed schedules and procurement lists; groups have no equivalent. |
Group-first, block-later workflow | Start complex assemblies as groups during iteration, then convert to a block with the BLOCK command when geometry stabilizes. |
PICKSTYLE controls group behavior | Set PICKSTYLE to 1 for group selection, 0 to edit individual members without ungrouping. |
Why the group-first habit changes how you draft
Most AutoCAD users learn Blocks first and treat Groups as an afterthought. That’s backwards for iterative design work. Groups let you move fast without the overhead of naming conventions, insertion points, and block table management. The cost is that you can’t propagate changes or extract data — which is fine until the design is settled.
The drafters who work most efficiently tend to treat Groups as a staging area. They’re not a lesser version of Blocks; they’re a different tool for a different phase of the work. The mistake is using Groups past their useful life — keeping geometry grouped when it’s been placed in 15 locations and you’re now manually editing each one. That’s the moment the group-to-block conversion pays off immediately.
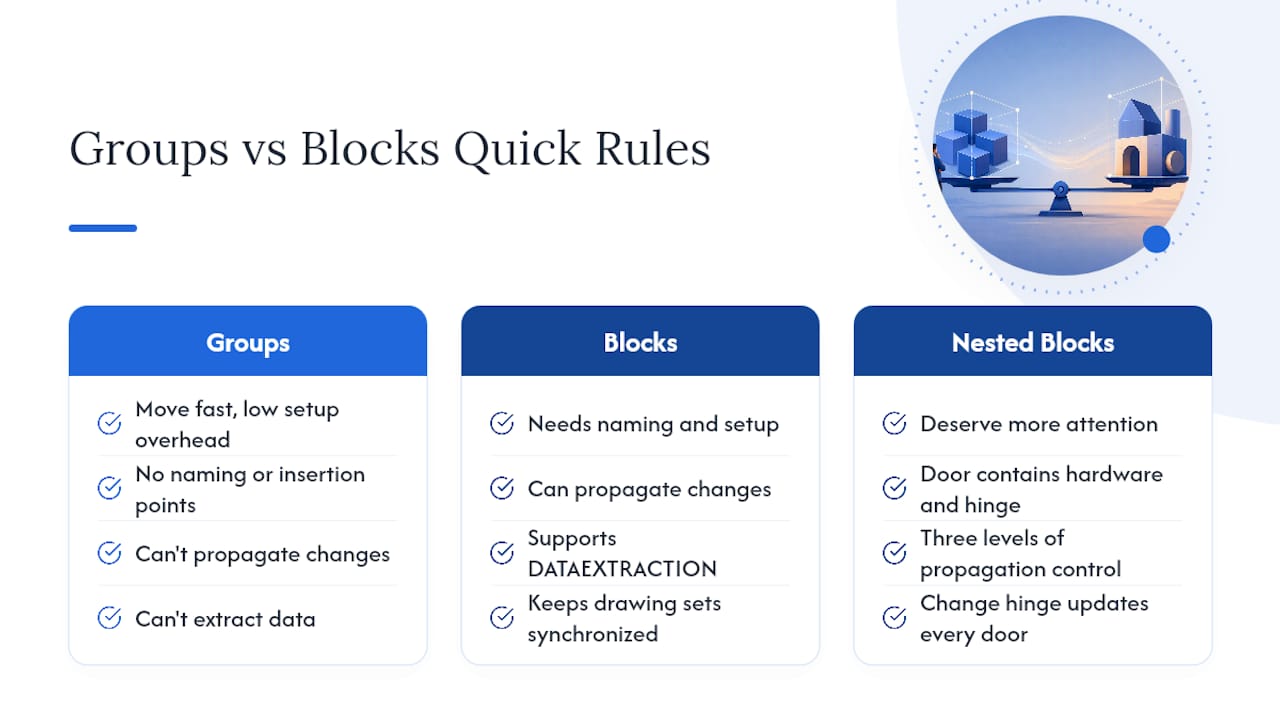
One thing the standard comparison articles miss: nested Blocks deserve more attention than they get. A door block that contains a hardware symbol block, which itself contains a hinge block, gives you three levels of propagation control. Change the hinge definition and every door in every drawing that uses that block family updates. Groups offer nothing comparable. For any project where drawing sets need to stay synchronized, that propagation chain is worth the upfront investment in block structure.
If you want to build that kind of block discipline into your workflow, S15studio’s AutoCAD mastery course covers block creation, attribute workflows, and DATAEXTRACTION in a project-based format. The complete Revit and AutoCAD training bundle extends that into BIM workflows for drafters moving toward Revit.

Useful sources and further reading
S15studio’s AutoCAD mastery course includes hands-on exercises for block creation, group-to-block conversion, and attribute-based data extraction — the practical skills that make the concepts above stick.
Recommended
Comments