
Revit Clash Detection Workflow for BIM Teams


Run quick internal checks inside Revit, export to Navisworks Clash Detective for federated, multi-discipline tests with search sets and tolerances, and publish to Autodesk Model Coordination for continuous cloud checks with issue assignment. That three-tier approach covers every project scale from a small in-house team to a large multi-firm coordination effort.
Coordinator quick-start checklist:
Confirm shared coordinates and workset naming across all linked models
Export NWC files with “Convert Element Parameters” and “Convert Element IDs” enabled
Build search sets by discipline pair (Structure vs. HVAC, HVAC vs. Plumbing, Plumbing vs. Electrical)
Set tolerances: 0" for hard clashes, 1"–2" for soft/clearance clashes
Run Clash Detective by category pair, not all-at-once
Group related clashes, assign owners, set resolution dates
Re-run the test after model updates to confirm closure
Three quick prioritization rules:
Hard clash (resolve immediately): Two elements physically occupy the same space. A structural beam through a duct is a site-stopper.
Soft clash (schedule for resolution): An element violates a clearance buffer. Flag it, assign it, and resolve it before the next milestone.
False positive (dismiss and document): A clash that results from modeling convention or tolerance mismatch, not a real conflict. Document why it was dismissed so it does not resurface.
Table of Contents
What does clash detection actually mean in a BIM workflow?
Clash detection in BIM is the process of finding and resolving conflicts between building elements from different discipline models before those conflicts become field problems. In a Revit project, that means federating the architectural, structural, and MEP models and checking where geometry intersects or violates clearance buffers.
Revit sits in the middle of the tooling spectrum. It has a native Interference Check that works well for quick, single-discipline or linked-model checks. For federated, multi-discipline coordination across multiple firms, most teams export to Navisworks Clash Detective or use Autodesk’s cloud Model Coordination platform.
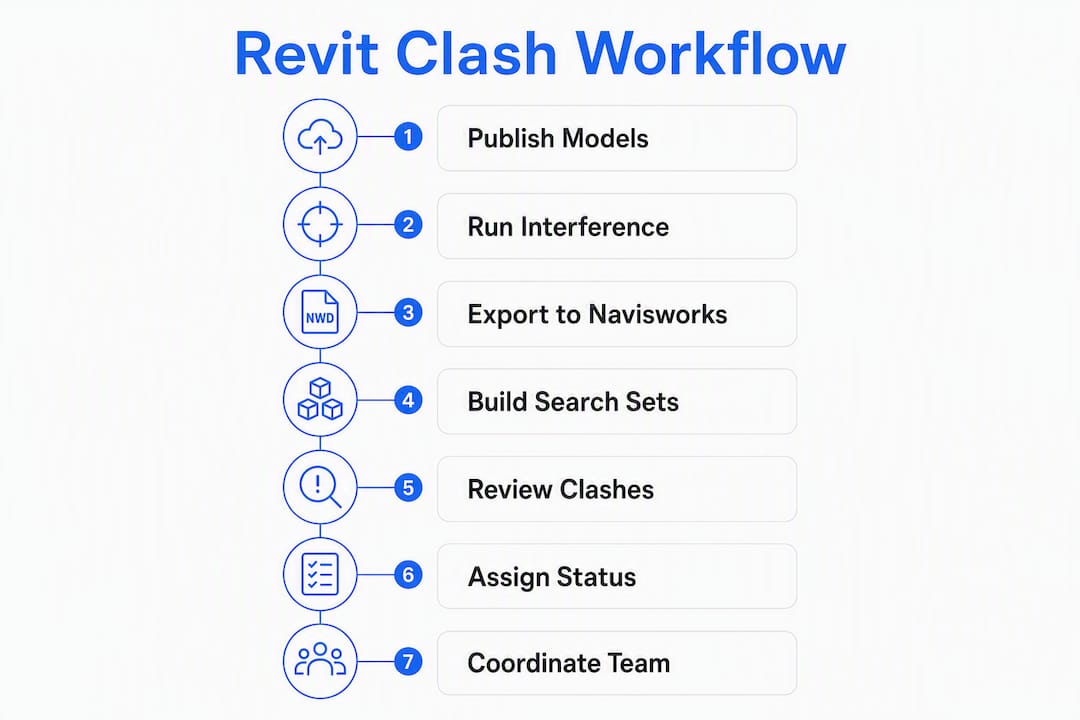
The practical payoff is real. Catching a duct-beam conflict in a model costs a fraction of what it costs to reroute ductwork after the steel is up. Fewer late-stage conflicts translate directly to fewer Requests for Information, lower rework costs, and more predictable construction schedules. For small projects with a single firm, Revit’s native tools often suffice. Once you have three or more disciplines from separate offices contributing models, a federated tool is worth the setup time.
What types of clashes will you find in Revit projects?
Not every clash in a report is equally urgent. Knowing the category before the coordination meeting saves everyone time.
Hard clashes occur when two elements physically overlap with zero clearance. A concrete beam running through an HVAC duct is the classic example. These are non-negotiable: something has to move before construction begins, or you will be cutting steel on-site.
Soft clashes (clearance clashes) occur when an element intrudes into a defined buffer zone around another element. A pipe running within 1" of a structural member may not physically intersect, but it leaves no room for insulation or a pipe hanger. Typical clearance tolerances run 1"–2" (25–50mm) for insulation and maintenance buffers, and up to 24"–36" (600–900mm) for electrical panel access.
Workflow clashes are sometimes called 4D clashes. They are not geometry conflicts at all. They represent scheduling or sequencing conflicts: a piece of equipment that cannot be installed because another trade has not completed its work, or a material delivery that conflicts with a structural pour. These require coordination between the project manager and site superintendent, not a model edit.
Misidentifying a workflow clash as a hard clash wastes coordination meeting time. Build a triage step into every review cycle so the team categorizes findings before assigning them.
Which approach fits your project: in-Revit, Navisworks, or cloud coordination?
The right tool depends on project size, the number of firms involved, and how mature your coordination process is. Here is how the three main paths compare across the criteria that matter most.
Criterion | Revit Interference Check | Navisworks Clash Detective | Cloud Model Coordination |
Integration with Revit | Native, no export needed | NWC/NWF export required | Publish via Revit cloud connector |
Issue tracking | Manual (export to report) | BCF/HTML export, status labels | Built-in cloud assignment and status |
Automation | On-demand only | Batch/scripted via Navisworks API | Continuous automated checks |
Clash granularity | Hard clashes, limited tolerance | Hard and soft, full tolerance control | Hard and soft, configurable rules |
Workflow fit | Small projects, in-house teams | Multi-discipline, multi-firm | Multi-firm, distributed teams |
Licensing | Included in Revit | Navisworks Manage required | BIM Collaborate Pro subscription |
Revit’s Interference Check is free and fast for a quick sanity check on a single discipline. Navisworks gives you the most control over search sets and tolerances and is the standard for production coordination on complex projects. Cloud Model Coordination removes the manual export step and runs checks automatically when models are published, which is a significant advantage on projects where disciplines update their models on different schedules.
Cost is a real factor. Navisworks Manage carries a separate license cost from Revit. Cloud Model Coordination requires an Autodesk BIM Collaborate Pro subscription. For teams that cannot justify either, Revit’s native tools plus a disciplined coordination schedule can still catch most critical conflicts.
How to run the Revit to Navisworks workflow step by step
This is the production workflow for multi-discipline coordination. Follow these steps in order.
Step 1: Prepare your Revit models
Confirm all discipline models share the same coordinate system. Misaligned coordinates are the single most common cause of false positives.
Audit worksets: each discipline should follow a consistent naming convention (e.g., “ARCH-Walls,” “MEP-HVAC,” “STR-Framing”).
Check that families are modeled to the correct Level of Development for the current milestone. Over-modeling at early stages inflates model size and generates noise in clash reports.
Purge unused families and verify that element levels are assigned correctly.
Step 2: Export NWC files from Revit
Go to File > Export > NWC.
In the NWC Export Settings dialog, enable Convert Element Parameters and Convert Element IDs. These two settings are non-negotiable: they preserve filterability in Navisworks and allow you to link clashes back to specific Revit elements by ID.
Export each discipline model as a separate NWC file. Keep file names consistent with your workset naming convention.
Open Navisworks Manage and append all NWC files into a single federated model (NWF).
Step 3: Build search sets in Navisworks
Search sets define which elements participate in each clash test. Focused sets produce focused reports.

Search Set Name | Category / Property Filter |
HVAC Ducts | Category = Ducts |
HVAC Main Trunk | Category = Ducts, Wide |
Plumbing Pipes | Category = Pipes |
Fire Protection | Category = Pipes, System = Fire Protection |
Cable Trays | Category = Cable Trays |
Structural Framing | Category = Structural Framing |
Save each search set so it persists across sessions. This is what makes the workflow repeatable.
Step 4: Configure Clash Detective tests
Open Clash Detective and create a new test. Name it by discipline pair: “STR vs. HVAC,” “HVAC vs. Plumbing,” and so on.
Set Selection A to the structural search set and Selection B to the HVAC search set.
Under Rules, add a “Same File” rule to ignore clashes within the same model file. This eliminates a large category of false positives immediately.
Set Tolerance: 0" (0mm) for hard clashes, 1"–2" (25–50mm) for soft/clearance tests.
Click Run Test.
Step 5: Manage and export results
Group related clashes before the coordination meeting. A single duct run conflicting with a beam at six points is one coordination issue, not six. Navisworks lets you multi-select and group clashes manually.
Assign a status to each group: New, Active, Reviewed, or Resolved. Export the results as BCF for model-aware issue exchange with other BIM tools, or as HTML for stakeholder summaries.
Pro Tip: When the Navisworks “Show” button fails to isolate an element in a complex model, copy the Element ID from the clash report and use Revit’s Select by ID function (Manage tab > Inquiry > Select by ID) to jump directly to the conflicting element. It is faster and more reliable than navigating the 3D view.
How does cloud Model Coordination work in practice?
Autodesk Model Coordination (part of BIM Collaborate Pro, now integrated into Autodesk Forma Design Collaboration) removes the manual NWC export step by running clash checks automatically when models are published to the cloud.
Publishing models from Revit
Use the Revit cloud connector to publish your model to the project’s Autodesk Docs folder. Before publishing, confirm that your model uses shared coordinates and that worksets are correctly configured. The cloud platform reads the published model directly, so parameter preservation depends on your Revit model quality, not on export settings.
How automated checks run
Once models from multiple disciplines are published, Model Coordination runs clash tests automatically based on the discipline combinations you configure in the project settings. It checks for hard and soft clashes and surfaces results in a browser-based dashboard. The checks run on a schedule tied to model publication events, so every time a discipline publishes an update, the results refresh.

What cloud coordination catches well: straightforward hard clashes between major building systems, and clearance violations where the tolerance rules are configured correctly. What it catches less precisely than Navisworks: complex tolerance scenarios, custom search set logic, and clashes that require parameter-level filtering. For those cases, fall back to a Navisworks session.
Assigning and verifying issues in the cloud
In the Model Coordination dashboard, select a clash, add a comment, assign it to a team member, and set a due date. The issue links to a model viewpoint so the assignee can see exactly what is conflicting. When the responsible discipline updates and republishes their model, the automated check re-runs and the issue status updates.
One practical tip: export a weekly HTML summary from the cloud dashboard and share it in your coordination meeting. It gives stakeholders a dated, visual record of open and resolved issues without requiring access to the platform.
What can you accomplish with Revit-native tools and add-ins?
Revit’s built-in coordination tools are more capable than most teams use them for. The limitation is not the tools themselves but the workflow around them.
Revit Interference Check (Collaborate tab > Interference Check) finds intersections between element categories within the current model and across linked models. You select which categories to compare (Beams vs. Ducts, Walls vs. Pipes), run the check, and get a grouped list of interferences. The “Show” button zooms to the conflicting elements. On large models, limit the category pairs you check in a single run. Running all categories simultaneously can be very slow and produces an unmanageable list.
Copy/Monitor lets one discipline track elements from another discipline’s linked model. When the monitored element moves or changes, Revit flags it.
Coordination Review surfaces those flagged changes as a list, letting the team accept or reject each one. Together, Copy/Monitor and Coordination Review provide proactive coordination: you catch a structural column that moved before it becomes a clash in the MEP model.
Ostacolo is a Revit add-in that automates clash detection and tracking inside Revit without requiring a Navisworks export. It runs interference checks, logs results, and lets you assign and track issues within the Revit environment. For small-to-medium projects where the team works in a single Revit model or a tightly linked set of models, Ostacolo reduces the round-trip overhead of exporting and re-importing results.
In-Revit workflows make the most sense when: the project has two or three disciplines from the same firm, Navisworks licenses are unavailable, or you need a fast daily check during active design. For multi-firm projects with five or more discipline models, the federated tools give you more control and a cleaner audit trail.
How should you structure the coordination process across a project?
Tools only work if the process around them is consistent. The biggest coordination failure on most projects is running one final check late in design rather than scheduled milestone-based checks throughout the project.
Roles in the issue lifecycle:
BIM Coordinator: runs clash tests, groups and triages results, chairs coordination meetings, maintains the tracking log.
Discipline Lead: reviews assigned clashes for their discipline, confirms resolution approach, and directs the model author.
Model Author: makes the geometry change in Revit and publishes the updated model.
Project Manager: monitors open issue counts, escalates unresolved structural or safety-critical conflicts, and communicates with the construction manager.
Coordination cadence by milestone:
Design Phase | Recommended Check Frequency | Focus |
Schematic Design | Monthly | Major routing conflicts, structural grid vs. MEP zones |
Design Development | Bi-weekly | HVAC trunk routing, structural penetrations, clearances |
Construction Documents / Permit | Weekly | All discipline pairs, tolerance-level soft clashes |
Construction Administration | As-needed | RFI-driven checks, change order impacts |
A practical routing priority reduces hard clashes before formal checks even run. Lock the structural model first, route HVAC main trunks second, then plumbing and fire protection, then electrical. This sequencing approach eliminates a large share of late-stage conflicts by establishing spatial hierarchy early.
Every resolved clash should be documented with a Clash ID (tied to the Revit Element ID), the date found, who it was assigned to, the resolution action taken, and the model version in which it was verified. A minimal tracking sheet with those five fields creates an auditable trail and prevents the same conflict from resurfacing in a later check.
What pitfalls turn clash reports into noise?
A clash report that nobody trusts is worse than no report at all. These are the three most common ways coordination breaks down.
Over-modeling for the milestone. Modeling more detail than the coordination task requires inflates model size and slows clash detection without improving outcomes. A schematic-phase model does not need fully detailed pipe fittings. Model to the intended output and strip back detail until the milestone demands it.
Running all-category checks too early. An all-categories check at schematic design produces thousands of results, most of which are irrelevant at that stage. Run targeted category pairs matched to the current milestone. Structure vs. HVAC trunk routing is the right check at design development. Full MEP vs. Architecture is the right check at permit.
Treating the raw report as the deliverable. Handing a 400-item clash list to a coordination meeting without triage is a fast way to lose the room. Before any meeting, sort results into three tiers: hard clashes that block construction, soft clashes that need scheduling, and false positives to dismiss. Only the first tier needs live discussion.
A fourth pitfall worth naming: misaligned coordinates between linked models. If the structural model and the MEP model do not share the same coordinate origin, every element in one model will appear to clash with elements in the other. Verify shared coordinates before the first export, and recheck them whenever a model is re-linked.
Also worth reviewing: common Revit modeling mistakes that generate false positives, including incorrectly assigned levels, duplicate elements, and families that extend beyond their intended bounding box.
What tolerances and clash rules should you use?
Tolerance choices determine whether your report is signal or noise. Here are defensible starting values for common discipline pairings.
Hard clash tolerance: 0" (0mm). No overlap is acceptable. Use this for structural vs. MEP checks and any check where physical intersection means a construction conflict.
Soft clash tolerance: 1"–2" (25–50mm). This covers insulation thickness and pipe hanger clearance for most standard MEP systems. Increase to 3"–4" (75–100mm) for large-diameter insulated pipes or ductwork in mechanical rooms.
Maintenance and service access clearance: 24"–36" (600–900mm). Apply this as a clearance zone around electrical panels, air handling units, and major mechanical equipment. This is a workflow-level rule, not a geometry tolerance, so it requires a separate soft clash test with a custom clearance body modeled around the equipment.
For U.S. teams working in feet and inches, the conversion is straightforward: 25mm ≈ 1", 50mm ≈ 2", 100mm ≈ 4". Most Navisworks tolerance fields accept decimal inches, so enter 1.0 for a 1" soft clash buffer.
When choosing tolerances, ask three questions: Can the element be insulated within this clearance? Can a worker access the element for maintenance? Can the element be installed given the construction sequence? If the answer to any of those is no, the tolerance is too tight.
How do you track, export, and close clashes reliably?
A clash is only resolved when the responsible discipline updates their Revit model and the clash test is re-run to confirm the geometry no longer appears in the report. Verbal agreements in a coordination meeting do not count.
Export formats:
BCF (BIM Collaboration Format): Use this for model-aware issue exchange. BCF files carry viewpoint data, element references, and issue metadata that other BIM tools can read. Import BCF into Revit using a BCF-compatible add-in to link issues directly to model elements.
HTML report: Use this for stakeholder summaries and meeting documentation. HTML reports are readable without BIM software and can be archived as dated records.
Verification workflow:
Export the clash report from Navisworks as BCF and HTML.
Import BCF into your issue tracker or directly into Revit.
Assign each issue to the responsible discipline lead with a target resolution date.
When the discipline updates their model, they publish a new NWC and notify the BIM coordinator.
The BIM coordinator re-runs the specific clash test (not the full suite) and confirms the clash no longer appears.
Update the tracking log: mark the Clash ID as resolved, record the model version, and date-stamp the entry.
Pro Tip: Use the Revit Element ID as your Clash ID in the tracking log. When a clash resurfaces in a later check, you can immediately identify whether it is the same element pair or a new conflict. Copy the Element ID from the Navisworks clash report and use Revit’s Select by ID to jump to the element in seconds.
Expert checklist for model coordination quality (S15studio trainer perspective)
Before every coordination meeting, run through this checklist. It takes less time than fixing a meeting that goes sideways because the models were not ready.
Shared coordinates confirmed. All linked models use the same coordinate origin. Re-verify after any model re-link.
Worksets audited. Each discipline follows the agreed naming convention. No elements sitting on the wrong workset.
Families checked. No families extending beyond their bounding box. No duplicate elements from copy-paste errors.
LOD appropriate for milestone. Pipe fittings, hangers, and insulation are modeled only if the current milestone requires them.
NWC exports verified. “Convert Element Parameters” and “Convert Element IDs” are enabled. File names match the workset convention.
Search sets loaded and current. Saved search sets reflect the current discipline scope. No stale sets from a previous project.
Targeted tests run. Clash tests are run by category pair, not all-at-once. Results are grouped before the meeting.
Triage complete. Every result is labeled: hard clash, soft clash, or false positive. False positives are documented with a reason.
Tracking log updated. All new clashes have a Clash ID, assigned owner, and target resolution date. All resolved clashes have a verified model version and date.
HTML report exported. A date-stamped HTML report is ready to share with stakeholders at the meeting.
For teams building a Revit coordination model process from scratch, running through this checklist for the first two or three coordination cycles builds the habit quickly. After that, it becomes automatic.
The most productive coordination meetings are short because the triage happened before the room filled up. Bring only hard clashes and unresolved soft clashes to the live discussion. False positives and already-resolved items belong in the log, not on the agenda.
When does a clash require escalation to site teams?
Not every clash stays in the model. Some geometry conflicts represent real site risks that need a human on the ground.
Escalate immediately when:
A structural penetration is required that was not in the original structural drawings. The structural engineer of record must approve any penetration through a beam, column, or shear wall.
An MEP conflict blocks the installation sequence for major equipment. If a rooftop unit cannot be set because the structural steel is in the way, the construction manager needs to know before the crane is scheduled.
A safety-critical system (fire suppression, egress lighting, emergency power) is in conflict with another element. These cannot wait for the next coordination cycle.
What to include in an escalation:
A model view or screenshot showing the conflict with element labels visible
The Clash ID and the Revit Element IDs for both conflicting elements
A date-stamped HTML or BCF report excerpt
A brief written description of the construction impact
RFI vs. documented acceptance: Issue an RFI when the conflict requires a design decision from the engineer of record or architect. Document and accept with a remediation plan when the conflict is minor, the fix is agreed upon by the discipline leads, and no design authority approval is needed. Never accept a structural penetration or a safety-system conflict without written approval from the appropriate design authority.
Key Takeaways
A repeatable Revit clash detection workflow runs milestone-based checks by discipline pair, uses verified NWC exports with Element IDs enabled, and closes issues only after a re-run confirms the geometry is resolved.
Point | Details |
Three-tier workflow | Use Revit for quick checks, Navisworks for federated tests, and cloud Model Coordination for continuous automated checks. |
NWC export settings | Always enable “Convert Element Parameters” and “Convert Element IDs” to preserve filterability and link clashes back to Revit elements. |
Tolerance standards | Set 0" for hard clashes, 1"–2" for soft/clearance clashes, and 24"–36" for maintenance access zones. |
Milestone-based cadence | Run targeted checks monthly at schematic design, bi-weekly at design development, and weekly at permit stage. |
S15studio training | S15studio’s project-based Revit courses cover worksharing, coordination workflows, and hands-on clash detection practice with lifetime access. |
The coordination meeting nobody wants to repeat
The most common complaint I hear from BIM coordinators is not that clash detection is hard. It is that the reports are useless. A 600-item clash list with no triage, no ownership, and no verified closures is not a coordination tool. It is a liability.
What actually works is the opposite of what most teams do at first. They run one big check late in design, panic at the results, and spend three weeks in emergency coordination meetings. The teams that get it right run small, targeted checks early and often. They treat the structural model as fixed and route everything else around it. They close clashes with a re-run, not a verbal agreement.
The tolerance question is where I see the most variation. Teams that set tolerances too tight generate hundreds of soft clashes that are technically valid but practically irrelevant. A 0.5" tolerance on a pipe that will be insulated to 1" thickness is not a useful check. Set tolerances that reflect real constructability constraints, and your report becomes something a contractor can actually act on.
One more thing: the verification step is non-negotiable. A clash that is “resolved” in a meeting but never re-run in the model will show up again in the next check. Build the re-run into your process as a formal gate, not an afterthought.
S15studio courses that build real coordination skills
Running a repeatable clash detection process takes more than reading a workflow guide. It takes practice on real models, with real discipline conflicts, under the kind of time pressure a project actually creates.

S15studio’s Revit training courses are built around exactly that kind of practice. The Complete Revit and AutoCAD Training package covers worksharing, linked model management, and coordination workflows through project-based exercises you can run on your own schedule. The dedicated Revit Worksharing course goes deep on multi-user model management, workset discipline, and the coordination cadence that keeps large teams from stepping on each other’s work. Every course comes with lifetime access to materials and direct support from Steve, an Autodesk Certified Trainer, so you can ask specific questions about your actual project setup. If your team needs to build coordination skills from the ground up, start with the worksharing course and work through the project labs before your next coordination cycle.
Useful sources and further reading
Revit Clash Detection: Workflow, Tools, and Best Practices — A broad overview of clash types, Navisworks integration, and the five-step detection process; useful as a reference for teams new to federated coordination.
Workflow: Using Revit and Navisworks — Autodesk’s official documentation on the Revit-to-Navisworks interoperability workflow; the authoritative source for export settings and Clash Detective setup.
Interference Checking — Autodesk Revit Help — Official reference for Revit’s native Interference Check, including category selection and linked model behavior.
Multi-Discipline Coordination — Autodesk Revit Help — Covers Copy/Monitor and Coordination Review in detail; essential reading for teams managing proactive coordination across linked models.
About Coordination Models — Autodesk Revit Help — Explains how to link NWC/NWD files as coordination models inside Revit for visual cross-checking; includes guidance on weekly reload cadence.
MEP Clash Detection: Revit + Navisworks Workflow Guide — Practical guide covering NWC export settings, search set construction, and tolerance recommendations for MEP coordination.
How to Run Revit MEP Coordination That Actually Catches Clashes — Strong operational guidance on routing priority, milestone-based scheduling, and tracking sheet structure; recommended for BIM coordinators building a coordination process from scratch.
Revit Coordination Model: A Guide for Architects — S15studio’s practical guide to coordination model setup, including sample schedules and publishing best practices.
Common Revit Modeling Mistakes Architects Must Avoid — Covers the modeling errors that generate false positives in clash reports, with fixes applicable before the first coordination check.
Recommended
Comments