
Revit Curtain Wall Design Workflow: 2026 Guide


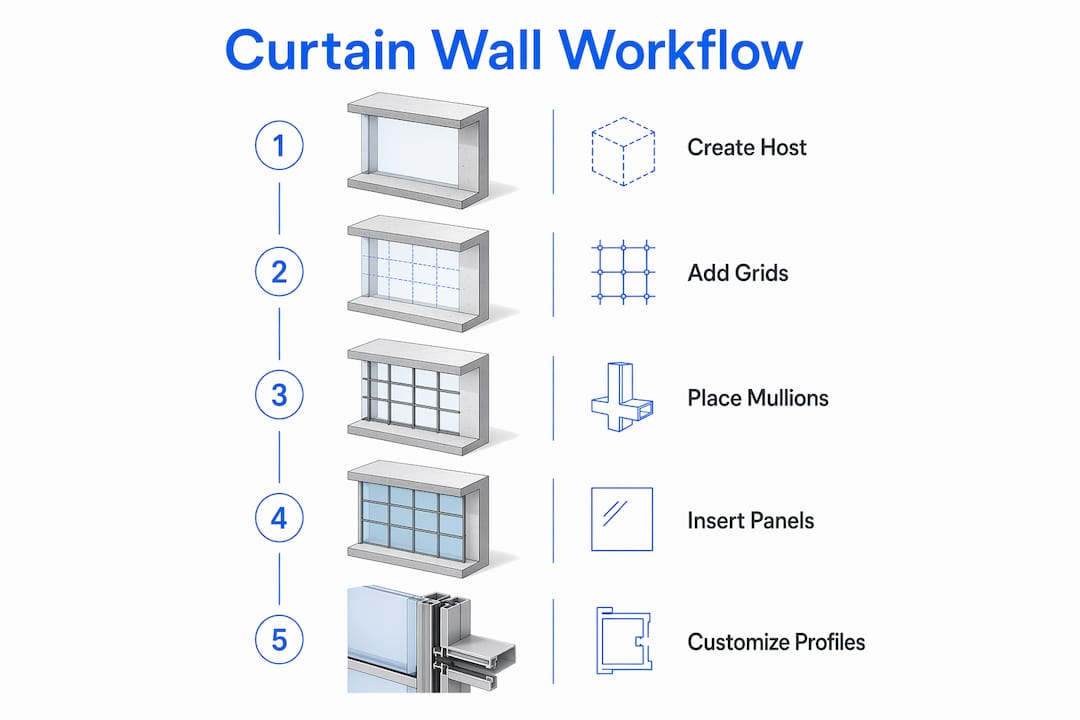
The Revit curtain wall design workflow is defined as a parametric, hierarchical system in which a host curtain wall contains curtain grids, which in turn host mullions, while panels fill the cells between grid lines. This structure gives architects direct control over facade geometry without rebuilding components from scratch. Standardizing grid spacing through Type Properties is recommended for 90–95% of commercial projects to control cost and maintain facade rhythm. Parametric controls are the core enabler of this workflow. They let you adjust spacing, mullion profiles, and panel types globally, across an entire facade, in seconds.
What are the essential tools for curtain wall design in Revit?
The Curtain Wall tool, Curtain Grids, Mullions, and panel families are the four building blocks of every curtain wall system in Revit. Each plays a distinct role, and understanding that role before you start modeling saves significant rework later.
The Curtain Wall tool creates the host element. You set its base and top constraints to align with structural levels, not arbitrary heights. This alignment keeps the model coordinated when floor-to-floor heights change during design development. Type Properties control grid spacing, mullion profiles, and panel assignments at the type level, so a single edit updates every instance of that type across the project.
Curtain Grids subdivide the wall face into cells. Mullions sit on grid lines and define the visual weight and structural character of the facade. Panel families fill the cells and can be glazed, opaque, or custom nested families. The table below summarizes each tool and its primary function.

Tool | Primary function |
Curtain Wall | Hosts the entire facade system and controls global type parameters |
Curtain Grid | Subdivides the wall face into cells using fixed or flexible spacing |
Mullion | Defines the profile and material of the frame on each grid line |
Panel Family | Fills each cell with glazing, solid infill, or a custom assembly |
Type Properties | Stores grid spacing, mullion profiles, and panel defaults at the type level |
Key settings to configure before modeling:
Set wall base and top constraints to named structural levels, not “Unconnected Height.”
Define grid spacing in Type Properties rather than placing grids manually for every instance.
Assign default mullion profiles at the type level so new grid lines inherit the correct profile automatically.
Use a separate curtain wall type for each distinct facade condition, such as storefront, ribbon window, or full-height glazing.
How to create and customize curtain wall grids, mullions, and panels?
Building a curtain wall in Revit follows a clear sequence. Skipping steps or working out of order creates coordination problems that are difficult to untangle later.
Place the curtain wall. Draw it on the correct level with base and top constraints locked to structural levels.
Set grid spacing in Type Properties. Use fixed distance or maximum spacing parameters. Parametric grids recalculate automatically when floor heights change, eliminating manual redraws.
Add manual grid lines where needed. Use the Curtain Grid tool to place additional lines for non-uniform bays. Pin grids that must stay fixed regardless of wall edits.
Assign mullion profiles. Place mullions on all grid lines using the Mullion tool. Assign border mullions and interior mullions separately, since they typically carry different profiles.
Swap panel families. Click any panel cell and use the Type Selector to replace the default glazing with an opaque panel, a door, or a custom nested family.
Embed the curtain wall into a host wall. For storefront conditions, draw the curtain wall inside a concrete or masonry host. Use the “Automatically Embed” toggle to cut the opening cleanly.
Pro Tip: When creating custom mullion profiles, draw only half the profile shape and use the Mirror tool to complete it. This guarantees symmetry and prevents the graphical artifacts that appear in elevation when profiles are drawn freehand on both sides.
Custom profiles deserve extra attention. A mullion profile is a 2D family loaded into the project and assigned through the Mullion Type. The fewer lines in the profile sketch, the cleaner the output in plan, section, and elevation. Overly complex profiles create display artifacts that look like modeling errors in construction documents. Keep profiles simple and test them in a section cut before finalizing.
Panel swapping is one of the most underused techniques in the curtain wall design process. You can replace any panel with a nested family that contains its own geometry, materials, and parameters. This approach works well for operable awning panels, louver assemblies, and sunshade systems that need to be scheduled and quantified separately.
What are the best practices for managing curtain wall types and variations?
Creating logically named Curtain Wall Types is the single most effective practice for keeping complex facade models manageable. A clear naming convention such as “CW-01 Full Height Glazing” or “CW-02 Ribbon Window” tells every team member exactly what each type represents without opening its properties.
Managing types instead of individual instances saves time and preserves project consistency. When the design team decides to change the mullion profile on all full-height glazing, one edit to the type updates every wall instance in the model. Editing instances one by one is error-prone and produces inconsistent documentation.
Design Options are the preferred method for comparing multiple curtain wall configurations within the same project. They let you place two or more facade options in the same elevation view without duplicating the model or creating separate files. This keeps construction documents clean and gives the client a direct visual comparison.
Method | Pros | Cons |
Design Options | Side-by-side comparisons, clean docs, no MEP conflicts | Requires careful setup; options must be managed actively |
Phases | Useful for renovation projects showing existing vs. new | Phase mapping causes visibility issues in curtain wall documentation |
Worksets | Good for team collaboration and model splitting | Overusing worksets for visibility creates MEP coordination errors |
Pro Tip: Never use phases or worksets as a substitute for Design Options when comparing curtain wall aesthetics. Phases affect schedule data and MEP coordination in ways that are hard to reverse. Design Options keep the comparison isolated and safe.
Worksets have a legitimate role in large projects for splitting the model across team members. The Revit worksharing workflow covers this in detail. The key distinction is that worksets control who owns which elements, not which design option is active. Mixing these two functions creates model instability.
How to troubleshoot common curtain wall challenges in Revit?
Most curtain wall problems in Revit trace back to a small set of recurring mistakes. Recognizing them early prevents hours of rework.
Common pitfalls and their fixes:
Non-symmetrical mullion profiles. The profile family was drawn freehand without mirroring. Fix it by deleting half the profile and using the Mirror tool to regenerate the other side.
Panels resizing unexpectedly. A grid line was moved after panels were customized. Pin critical grid lines to prevent accidental movement.
Curtain wall not cutting the host wall. The “Automatically Embed” toggle is off. Enabling this toggle cuts the opening automatically and removes the need for fragile manual profile edits.
Mullions disappearing in elevation. The mullion profile contains too many lines, causing a display conflict. Simplify the profile sketch to resolve it.
Grid lines shifting when the wall height changes. The grids were placed manually at fixed offsets instead of using parametric spacing. Redefine spacing through Type Properties so grids recalculate with the wall.
Pro Tip: Test every curtain wall type in a dedicated test model before bringing it into the live project. This catches profile errors, panel swap issues, and embedding problems before they affect the construction document set.
Parametric grid adjustments are the most powerful fix for height-change problems. Defining grids through adjustable parameters is core to an efficient Revit workflow. When the structural engineer revises floor-to-floor heights, a parametric curtain wall updates its grid layout automatically. A manually placed grid requires you to delete and redraw every line.
What advanced tips enhance parametric curtain wall workflows?
Expert-level curtain wall modeling in Revit is less about adding complexity and more about removing it. The architects who produce the cleanest documentation are the ones who keep their families simple and their naming conventions strict.
Minimizing lines in profile families prevents elevation non-symmetry and reduces model complexity. Every extra line in a profile sketch is a potential source of graphical artifacts in plan and section views. Draw only what the profile needs to communicate structurally and visually.
Nested parametric families unlock the most complex panel assemblies. An operable awning panel, for example, can contain its own geometry, a shared parameter for the opening angle, and a material parameter for the frame finish. When this family is swapped into a curtain wall cell, it schedules automatically alongside standard glazing panels. This approach works for sunshades, integrated blinds, and ventilation louvers.
Pro Tip: Build a project-specific curtain wall family library with clear naming conventions before modeling begins. A library named by facade condition, mullion size, and panel type gives every team member a reliable starting point and prevents duplicate family creation mid-project.
Curtain Walls behave like standard wall system families and support profile editing and face flipping, which Curtain Systems do not. Reserve Curtain Systems for genuinely complex shapes such as sloped or doubly curved facades. For nearly all vertical glazing applications, the standard Curtain Wall tool gives you more editing flexibility with less modeling overhead.
Key Takeaways
A well-structured Revit curtain wall design workflow relies on parametric type control, logical naming conventions, and Design Options to keep complex facade models accurate and easy to update.
Point | Details |
Use Type Properties for grid spacing | Set spacing at the type level so all instances update together when the design changes. |
Prefer Design Options over phases | Design Options keep facade comparisons clean and avoid MEP coordination errors. |
Mirror mullion profiles for symmetry | Delete half the profile and mirror it to eliminate graphical artifacts in elevation. |
Enable “Automatically Embed” | This toggle cuts host wall openings cleanly without fragile manual profile workarounds. |
Name curtain wall types logically | Clear type names enable global updates and keep large project models consistent. |
What I’ve learned from years of curtain wall modeling in Revit
The biggest mistake I see architects make with curtain walls is treating them like standard walls with extra steps. They are not. They are parametric systems, and the moment you start editing instances instead of types, you lose the entire efficiency advantage the tool offers.
The second most common mistake is skipping the test model. Every custom profile, every nested panel family, every embedded curtain wall condition should be validated in isolation before it enters the live project. I have seen construction document sets go out with mullion artifacts in every elevation because nobody tested the profile family. That is a preventable problem.
What genuinely changes the quality of your work is committing to a naming convention before you start. A project where every curtain wall type has a clear, descriptive name is a project where global changes take minutes. A project where types are named “Curtain Wall 1” through “Curtit Wall 14” is a project where every revision is a guessing game. If you want to go deeper on Revit’s parametric modeling tools, the S15studio YouTube channel has practical walkthroughs that cover these exact scenarios.
— Steve
Take your Revit curtain wall skills further with S15studio
Knowing the theory behind curtain wall workflows is one thing. Applying it under real project pressure is another. S15studio offers structured Revit training from introductory to advanced levels, all built around practical, project-based exercises that reflect how design professionals actually work.

The complete Revit training program at S15studio covers curtain wall systems, parametric families, worksharing, and documentation workflows in a single, cohesive curriculum. Courses are taught by Steve Fagan, an Autodesk Certified Trainer, and are designed to build skills you can apply on your next project immediately. If you are newer to the software, the Revit introduction course is the right starting point for building a solid foundation before tackling complex facade systems.
FAQ
What is the basic structure of a Revit curtain wall system?
A Revit curtain wall system is structured as a host curtain wall that contains curtain grids, which host mullions, while panels fill the cells between grid lines. This hierarchy means every element is controlled by the one above it.
When should I use a Curtain Wall vs. a Curtain System in Revit?
Use the Curtain Wall tool for nearly all vertical glazing applications because it supports profile editing and face flipping. Reserve Curtain Systems for complex sloped or curved facades where the standard wall tool cannot follow the geometry.
How do Design Options help manage curtain wall types?
Design Options let you place multiple curtain wall configurations in the same model and compare them in elevation views without duplicating files or affecting MEP coordination. They keep construction documents accurate during design development.
Why do mullion profiles cause graphical artifacts in Revit?
Mullion profile families with too many sketch lines produce display conflicts in plan, section, and elevation views. Simplifying the profile and using the Mirror tool to create symmetrical geometry resolves most artifact problems.
How does the “Automatically Embed” toggle work for curtain walls?
The “Automatically Embed” toggle cuts an opening in the host wall when a curtain wall is placed inside it. This removes the need for manual profile edits and produces a cleaner, more stable model connection between the curtain wall and its host.
Recommended
Comments