AutoCAD Trim and Extend Explained for Designers
- Steve Fagan

- 2 days ago
- 8 min read

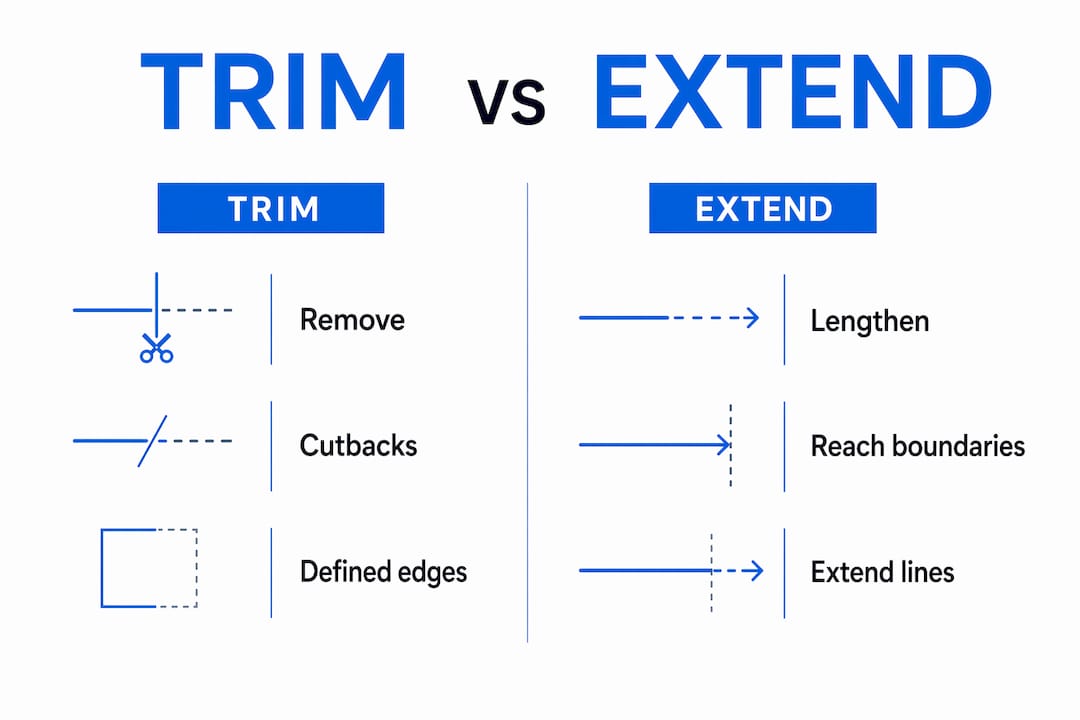
The AutoCAD TRIM command removes unwanted portions of objects using defined cutting edges, while the EXTEND command lengthens objects to meet specified boundaries. Together, these two editing tools form the backbone of precise drawing modification in architectural and engineering workflows. Getting AutoCAD trim and extend explained correctly matters because both commands changed behavior starting with AutoCAD 2021, and many users still work with outdated mental models. This guide covers the full workflow, key options, system variables, and productivity shortcuts you need to use both commands with confidence.
How does the AutoCAD trim and extend workflow actually work?
The TRIM command follows a two-step selection process. You select cutting edges first, press Enter to confirm, then click the portions of objects you want to remove. The cutting edge is the object that defines where the trim happens. The target is the object being cut.
EXTEND works the same way in reverse. You select boundary edges first, press Enter, then click the objects you want to lengthen. AutoCAD stretches each selected object until it meets the nearest boundary. Both commands share the same selection logic, which makes learning one much easier once you know the other.

The shortcut key for TRIM is TR, and for EXTEND it is EX. Both are among the most frequently used AutoCAD editing tools in any architectural or engineering drawing session.
How to use the TRIM command step by step
The standard TRIM workflow in AutoCAD runs as follows:
Type TR and press Enter to start the TRIM command.
Click the objects you want to use as cutting edges. You can select one or several.
Press Enter to end cutting edge selection.
Click the portion of each object you want to remove.
Press Enter or Escape to exit the command.
For large drawings, the Crossing selection method lets you drag a rectangle across multiple objects and trim everything that crosses it in one pass. The Fence option works similarly. You drag a polyline across the drawing, and AutoCAD trims every object the line touches. Crossing and Fence selections are especially useful when cleaning up floor plan linework or site boundary geometry.
Quick TRIM mode
Quick TRIM is available from AutoCAD 2021 onward. You activate it by pressing Enter at the cutting edge prompt without selecting anything. AutoCAD then treats every object in the drawing as a potential cutting edge. You can click or drag to trim freely. This mode is fast for simple cleanup tasks, but it can produce unintended results in dense drawings where many objects overlap.
Pro Tip: Hold Shift while clicking during the TRIM command to temporarily switch to EXTEND. This Shift + Select toggle lets you trim and extend within the same command session without restarting. It is one of the most underused productivity shortcuts in AutoCAD.
How to use the EXTEND command effectively
The EXTEND command mirrors the TRIM workflow almost exactly. Here is the step-by-step process:
Type EX and press Enter to start the EXTEND command.
Click the objects you want to use as boundary edges.
Press Enter to end boundary selection.
Click the end of each object you want to extend toward the boundary.
Press Enter or Escape to exit.
AutoCAD extends the selected object from its nearest endpoint toward the boundary edge. If the object’s projected path does not reach the boundary, AutoCAD will not extend it unless you change the Edge option (covered in the next section). The Crossing and Fence selection methods work in EXTEND exactly as they do in TRIM, making it straightforward to extend multiple lines to a single boundary in one action.
A practical example: you are drawing a structural grid in AutoCAD and several column lines fall short of the perimeter wall. Select the perimeter wall as the boundary edge, then use Fence selection to drag across all the short column lines. AutoCAD extends every one of them to the wall in a single step.
Pro Tip: Hold Shift while clicking during EXTEND to temporarily switch to TRIM. The toggle works both ways, so you never need to exit one command and start the other.
What options and system variables control TRIM and EXTEND behavior?
This is where most users run into trouble. AutoCAD exposes several command-line options that change how TRIM and EXTEND behave, and one system variable that has caused widespread confusion since AutoCAD 2021.
The TRIMEXTENDMODE system variable
Starting with AutoCAD 2021, Autodesk changed the default behavior of both commands by introducing Quick mode. The TRIMEXTENDMODE system variable controls which mode is active:
TRIMEXTENDMODE = 1 activates Quick mode. AutoCAD skips the cutting edge selection step and treats all objects as edges automatically.
TRIMEXTENDMODE = 0 restores Standard mode. AutoCAD prompts you to select cutting edges before trimming, matching the behavior from AutoCAD 2020 and earlier.
If your TRIM or EXTEND command stopped working the way you expect after an AutoCAD upgrade, check TRIMEXTENDMODE first before changing anything else in your drawing setup.
Project option: critical for 3D work
The Project option controls how AutoCAD determines whether objects intersect. Three settings are available:
None: AutoCAD only trims or extends objects that physically intersect in 3D space.
UCS: AutoCAD projects objects onto the current User Coordinate System plane and trims based on that projection. This is the default for most 2D work.
View: AutoCAD projects objects onto the current view plane, which is useful for specific 3D visualization tasks.
Selecting the correct projection mode directly impacts accuracy in 3D models. Many users working in 3D find that objects appear to intersect on screen but do not trim correctly because the Project mode is set to None and the objects do not physically touch.
Edge option: extend vs. no extend
The Edge option determines whether AutoCAD requires an actual intersection or allows a virtual one.
Edge setting | Behavior | Best use case |
Extend | Trims or extends as if lines are infinite | Useful when edges do not physically meet |
No Extend | Requires actual intersection to trim or extend | Best for tight, controlled 2D linework |
Pro Tip: When trimming lines that meet at an implied intersection rather than a physical one, switch Edge to Extend. This virtual intersection setting removes the need to draw construction lines just to create a trim boundary.
Common pitfalls when using TRIM and EXTEND
Even experienced AutoCAD users make predictable mistakes with these commands. Knowing them in advance saves significant time.
Leftover geometry after trimming. This happens when the object you are trimming does not actually intersect the cutting edge. AutoCAD only removes the portion that crosses the edge. Non-intersecting remnants require the Erase option (type R during the command) or a separate Delete step.
Confusing cutting edges with target objects. The cutting edge defines the boundary. The target object is what gets trimmed. Swapping these mentally leads to selecting the wrong objects at the wrong prompt. Slow down at the first selection step and confirm which role each object plays.
Ignoring TRIMEXTENDMODE after an upgrade. If TRIM suddenly selects everything at once without asking for cutting edges, the system variable has defaulted to Quick mode. Type TRIMEXTENDMODE, set it to 0, and Standard mode returns.
Wrong Project setting in 3D drawings. Objects that look like they intersect in a plan view may not intersect in 3D. Set Project to UCS for standard 2D drafting and None only when working with true 3D geometry.
Not using Shift toggle. Switching between TRIM and EXTEND by restarting commands wastes time. The Shift + Select toggle handles both actions in a single session.
For users who are still building their foundation with AutoCAD commands, the getting started with AutoCAD guide from S15studio covers the core editing workflow before you reach TRIM and EXTEND.
TRIM vs. EXTEND: when to use each command
Both commands modify object geometry relative to a reference. The table below shows the key differences.
Feature | TRIM | EXTEND |
Core function | Removes excess geometry | Lengthens geometry to a boundary |
First selection | Cutting edges | Boundary edges |
Shortcut key | TR | EX |
Shift toggle | Temporarily extends | Temporarily trims |
Typical use case | Cleaning up intersecting lines | Closing gaps between objects |
TRIM is the right tool when objects overlap and you need to remove the excess. EXTEND is the right tool when objects fall short of a boundary and need to reach it. In practice, most drawing cleanup sessions use both commands in sequence. You extend lines to a boundary, then trim the portions that cross it.
Key takeaways
The TRIM and EXTEND commands are the two most important editing tools for precise geometry control in AutoCAD, and mastering their options and system variables separates efficient drafters from slow ones.
Point | Details |
TRIM removes, EXTEND lengthens | TRIM cuts objects at a defined edge; EXTEND stretches objects to meet a boundary. |
TRIMEXTENDMODE controls behavior | Set this system variable to 0 for Standard mode if commands behave unexpectedly after AutoCAD 2021. |
Shift toggle saves time | Hold Shift during either command to switch between trimming and extending without restarting. |
Edge and Project options matter | Edge controls virtual vs. actual intersections; Project controls 2D vs. 3D trimming logic. |
Crossing and Fence speed up bulk edits | Use these selection methods to trim or extend multiple objects in a single action. |
What I have learned after years of teaching TRIM and EXTEND
The single biggest issue I see with AutoCAD users is not that they do not know the commands exist. It is that they do not know the commands have options. Most people type TR, press Enter twice, and start clicking. That works for simple cases. It fails the moment you hit a 3D model, a drawing with overlapping geometry, or an AutoCAD version newer than 2020.
The TRIMEXTENDMODE variable catches almost everyone off guard after an upgrade. I have watched experienced drafters spend 20 minutes trying to figure out why TRIM is behaving like a magic eraser. The answer is always the same: Quick mode is on. Type the variable name, set it to 0, and move on.
The Shift toggle is the other thing I push hard in every training session. Most users restart the command every time they need to switch between trimming and extending. That is three extra keystrokes per switch, multiplied across hundreds of edits in a single drawing session. Learning to hold Shift and click in the opposite direction costs nothing and saves real time.
The Edge option is the most overlooked setting of all. Architectural drawings frequently have lines that imply an intersection without physically touching. Setting Edge to Extend lets you trim to that implied point without drawing construction geometry first. That one setting alone can cut cleanup time on a complex floor plan by a meaningful amount.
AutoCAD rewards users who take the time to understand what is happening under the hood. TRIM and EXTEND look simple on the surface. They are not. The options, the system variables, and the selection methods are where the real efficiency lives.
— Steve
Take your AutoCAD skills further with S15studio
Knowing how TRIM and EXTEND work is a strong foundation. Applying them fluently across complex architectural and engineering drawings takes structured practice with real project files.
S15studio’s AutoCAD mastery course covers every major editing command, including TRIM and EXTEND, within project-based exercises built for architects and technical designers. The course is led by Steve Fagan, an Autodesk Certified Trainer, and includes lessons on command options, system variables, and the workflow habits that separate competent drafters from fast ones. If you want to build that level of fluency, the full training platform at S15studio also includes AutoCAD certification preparation alongside Revit training.
FAQ
What does the TRIM command do in AutoCAD?
The TRIM command removes portions of objects that extend past a defined cutting edge. You select the cutting edge first, press Enter, then click the parts of objects you want to delete.
Why is my TRIM command not working the same as before?
Starting with AutoCAD 2021, the default mode changed to Quick mode. Set the TRIMEXTENDMODE system variable to 0 to restore Standard mode, which prompts you to select cutting edges before trimming.
What is the difference between TRIM and EXTEND in AutoCAD?
TRIM removes excess geometry at a cutting edge. EXTEND lengthens geometry to reach a boundary edge. Both use the same two-step selection process and share the Shift toggle to switch between them.
How do I extend multiple lines at once in AutoCAD?
Use the Fence selection option during the EXTEND command. Drag a polyline across all the objects you want to extend, and AutoCAD extends every object the fence line touches toward the selected boundary.
What does the Edge option do in TRIM and EXTEND?
The Edge option set to Extend allows AutoCAD to trim or extend objects to a virtual intersection, even when the cutting or boundary edge does not physically reach the target object. This removes the need for construction lines in many common drafting situations.
Recommended
Comments