Revit Dimension Types Explained for Architects
- Steve Fagan

- 8 hours ago
- 8 min read

Revit dimension types are specialized annotation tools that control how measurements display, stack, and behave across your architectural documentation. Understanding the difference between Continuous, Baseline, and Ordinate strings, along with the properties that govern witness lines, text placement, and equality formulas, is what separates clean, coordinated drawings from ones that require constant manual correction. This guide covers every major dimension category, explains how each one behaves in a live model, and gives you a practical framework for setting up dimension standards that hold up through design iterations and construction documentation.
What are the main Revit dimension string types and how do they differ?
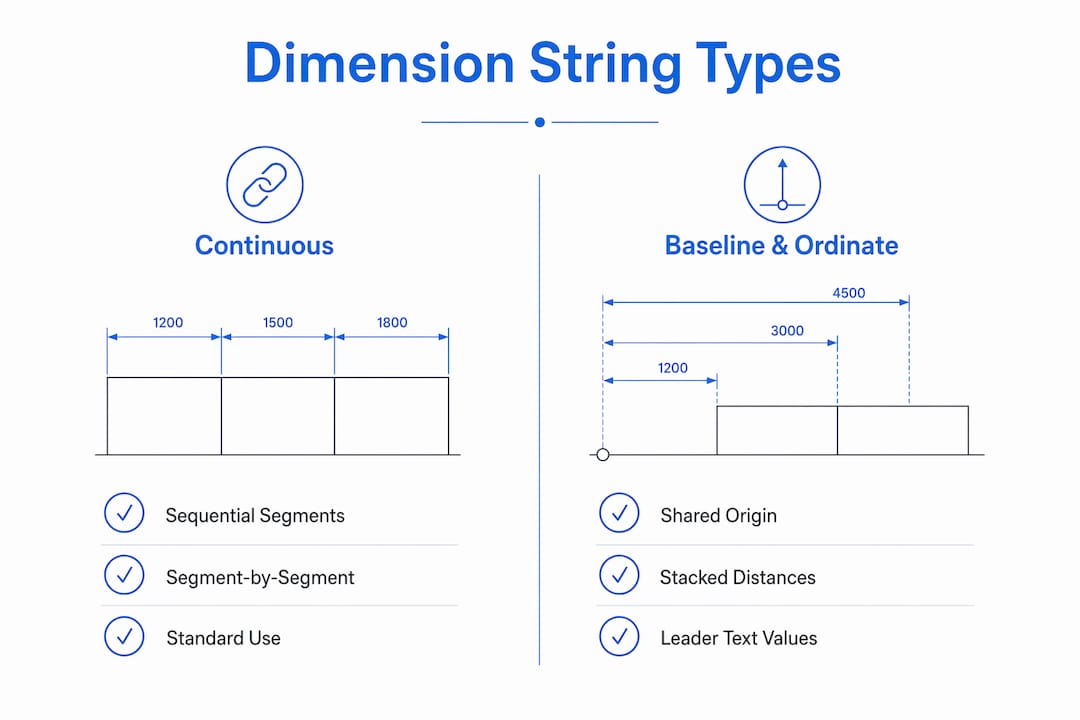
Revit dimension string types include three core options: Continuous, Baseline, and Ordinate. Each controls the layout and display of multi-segment linear dimension strings in a fundamentally different way. Choosing the wrong type for the task adds clutter to your drawings and forces manual cleanup later.
Continuous dimensions
Continuous strings place measurements sequentially along a single dimension line. Each segment reports the distance between adjacent reference points, so you read individual bay widths or wall lengths from left to right. This type is the most common in architectural floor plans and is the default in most Revit project templates.

Baseline dimensions
Baseline strings stack dimensions evenly from a shared base point. Every segment measures back to that same origin, so you see cumulative distances rather than individual spans. This type is standard in structural and modular layouts where every element must be located relative to a single datum, such as a grid intersection or a finished floor level.
Ordinate dimensions
Ordinate strings measure from a single origin point and display values with leader text rather than a traditional dimension line. The result is a compact, readable annotation that works well in repetitive conditions like curtain wall mullion spacing or stair tread layouts. Ordinate dimensions reduce cognitive load by reporting totals from one reference, which is especially useful in repetitive detailing.
Dimension type | How it measures | Best use case |
Continuous | Sequential, segment by segment | Floor plans, wall layouts |
Baseline | All segments from a common base point | Structural grids, modular coordination |
Ordinate | Single origin with leader text | Curtain walls, stair treads, repetitive details |
Pro Tip: Set your project template to include all three string types as pre-configured dimension types. Switching between them mid-project without a template standard creates inconsistent annotation behavior across views.
Beyond string type, each dimension family carries its own set of type properties. Those properties control everything from tick mark style to text size to witness line behavior. Getting those settings right at the type level is where real documentation quality is built.
How do Revit dimension properties and styles impact documentation quality?
Dimension type properties control witness line appearance, center line symbols, text placement, and equality formulas. These settings determine whether your drawings look clean and professional or require constant manual adjustment. Office detailing quality often depends on getting these settings right at the type level, not the instance level.
Witness line control
The Witness Line Control setting is one of the most overlooked properties in Revit. Setting it to “Fixed to Dimension Line” and specifying a witness line length removes the need to manually drag extension lines on every dimension you place. Witness line settings at the type level propagate to every instance of that dimension type, which means one configuration change cleans up hundreds of annotations at once.
Center line symbols
Center-dimension styles add center line symbols and control line patterns and tick marks for elements dimensioned to their center, such as columns, openings, and structural members. A dedicated center-dimension type guarantees consistent centerline appearance without relying on manual host selection each time. This is a small setup investment that pays off across every detail sheet in a project.
Equality formulas
Revit supports equalizing dimension segments, where segments display as equal with a customizable equality formula. You can configure the formula to show “EQ” for equal spacing, report the actual segment length, or display the total divided by count. This feature is particularly useful in facade design and modular planning where communicating equal spacing is part of the design intent.
Key dimension properties to configure at the type level:
Witness Line Control: Set to “Fixed to Dimension Line” for clean, consistent extension lines
Witness Line Length: Define a standard length that matches your office’s drawing standards
Center Line Symbol: Enable for dimension types used on columns and openings
Equality Formula: Configure to match how your team communicates equal spacing
Text Placement: Set reading orientation and offset to match your sheet standards
Tick Mark Style: Choose a tick mark that aligns with your office’s annotation conventions
Pro Tip: Duplicate your base dimension type before changing any properties. Revit dimension types are system families, and you cannot delete the last instance of a type. Duplicating first gives you a clean fallback if a setting produces unexpected results.
How do Revit dimensions behave dynamically within model views?
Revit dimensions are live annotations that update automatically when model elements move or change. Moving a wall updates every dimension string that references it, which eliminates the manual re-dimensioning that AutoCAD workflows require after design changes. This live behavior is one of the strongest arguments for Revit over traditional 2D drafting.
Dimensions in Revit are also view-specific annotations. They appear only in the view where they were placed and resize automatically when the view scale changes. That means a dimension placed in a 1:100 floor plan will not appear in a 1:50 enlarged plan unless you add it there separately. This is not a limitation. It is a feature that gives you precise control over what annotation appears on each sheet.
Four behaviors every architect should understand about Revit dimensions:
Automatic value updates: Dimension values recalculate instantly when referenced elements move, so your drawings stay accurate through design iterations without manual intervention.
View-specific placement: Dimensions exist only in the view they are drawn in. Managing this deliberately prevents annotation clutter across multiple views of the same area.
Scale-responsive text: Dimension text and tick marks scale with the view, so a single type property setting produces correct annotation size at any view scale.
Constraint behavior: Locking a dimension creates a constraint that prevents the referenced elements from moving independently. Use this deliberately, not by accident.
The live nature of Revit dimensions also means that dimension precision settings should align with construction tolerances. Revit can display extreme decimal precision, but showing six decimal places on a construction drawing creates confusion rather than clarity. Your dimension type settings should reflect the accuracy your contractor actually needs.
What are best practices for setting up Revit dimension types in architectural workflows?
Dimension types are system families managed through the dimension properties dialog. They live in your project file and transfer with your project template. Getting your template right means every new project starts with consistent, standards-compliant dimension behavior from day one.
Practical setup strategies for architectural teams:
Duplicate before modifying: Always duplicate an existing dimension type and rename it before changing properties. This preserves the original and gives your team a clear naming convention.
Create dedicated center types: Set up a separate dimension type specifically for dimensioning to centers of columns and openings. Configure the center line symbol and tick mark at the type level so every placement is consistent.
Align precision with tolerances: Set decimal places in your dimension type to match your office’s construction tolerance standards. A residential project and a high-tolerance commercial fitout need different precision settings.
Standardize string types by task: Assign Continuous types for general floor plan annotation, Baseline types for structural grid documentation, and Ordinate types for repetitive facade or stair details.
Control witness lines at type level: Configure witness line length and control settings once in the type properties. This removes the need for instance-level adjustments and produces repeatable annotation behavior across every view.
Pro Tip: Build a dimension type legend into your project template. A simple drafting view listing each dimension type with a sample annotation helps new team members use the right type for each task without guessing.
Architects working on modular or prefabricated designs benefit most from Baseline and Ordinate types. Both types communicate location relative to a fixed reference, which is exactly what fabricators and structural engineers need when reading your drawings. If you are new to Revit’s annotation tools, starting with a solid understanding of dimension type properties is the fastest way to produce professional documentation.
Key takeaways
Revit dimension types control annotation layout, witness line behavior, and measurement precision at the type level, making template-level configuration the single most effective way to maintain consistent documentation across a project.
Point | Details |
Three core string types | Continuous, Baseline, and Ordinate each serve distinct documentation tasks. |
Type-level properties matter | Witness line control, center line symbols, and equality formulas set at type level eliminate manual rework. |
Dimensions are live and view-specific | Values update automatically with model changes and appear only in the view where placed. |
Precision should match tolerances | Set decimal places to reflect construction tolerances, not Revit’s maximum display capability. |
Template setup is the priority | Standardizing dimension types in your project template ensures consistent annotation from project start. |
Why dimension types deserve more attention than most architects give them
Most architects I work with treat Revit dimensions as a basic tool. They place a string, move on, and deal with cleanup later. That approach costs real time on every project. The dimension type system in Revit is genuinely powerful, and the payoff for learning it properly is not marginal. It is significant.
The most common mistake I see is treating all dimension tasks with a single default type. The default Continuous type works for general annotation, but it is not set up for centerline dimensioning, it does not communicate equal spacing, and its witness line behavior is rarely configured to match office standards. Using one type for everything means manual adjustments on almost every string you place.
The second mistake is ignoring precision settings. Revit will display dimensions to six decimal places if you let it. That level of precision on a construction drawing does not communicate accuracy. It communicates that no one reviewed the dimension type settings. Aligning your displayed precision with your construction tolerances is a professional standard, not a stylistic preference.
My recommendation is to spend two hours in your project template before your next project starts. Duplicate your base dimension type, create a center type, configure witness line controls, and set your equality formula. That two-hour investment will save you hours of cleanup on every project that follows. Experimenting with dimension types in a test file first is the fastest way to understand what each property actually does. If you want a structured path through Revit’s annotation tools, the S15studio Revit blog covers dimension workflows with practical, project-based examples.
— Steve
Level up your Revit documentation skills with S15studio
Mastering Revit dimension types is one part of a much larger documentation skill set. S15studio offers structured training paths built specifically for architects and design professionals who want to move from basic Revit use to confident, production-ready documentation.
The Complete Revit and AutoCAD Training program covers annotation standards, dimension workflows, and project documentation from beginner through advanced level. Every course is built by Autodesk Certified Trainer Steve Fagan and designed around real architectural workflows, not generic software tutorials. If you are earlier in your Revit learning, the beginner introduction course is the right starting point for building solid dimension and annotation fundamentals.
FAQ
What are the three main dimension string types in Revit?
Revit includes Continuous, Baseline, and Ordinate dimension string types. Continuous strings measure sequentially between adjacent points, Baseline strings measure from a shared origin, and Ordinate strings report distances from a single reference with leader text.
Are Revit dimensions view-specific?
Yes. Revit dimensions are view-specific annotations that appear only in the view where they were placed. They scale automatically with the view scale but do not transfer to other views of the same model area.
How do I stop Revit witness lines from looking inconsistent?
Set the Witness Line Control property to “Fixed to Dimension Line” and define a standard witness line length in the dimension type properties. This type-level setting applies to every instance of that type and removes the need for manual extension line adjustments.
What does the equality formula do in Revit dimensions?
The equality formula controls how equal dimension segments are labeled. You can configure it to display “EQ,” show the actual segment length, or report the total divided by count. Equality formulas are set in the dimension type properties and apply to every string using that type.
How many decimal places should Revit dimensions display?
Revit can display extreme decimal precision, but your dimension type settings should match your construction tolerances. Most architectural projects use whole numbers or single decimal places. Displaying more precision than your tolerances require creates confusion on construction documents.
Recommended
Comments