
AutoCAD Model Space vs Paper Space: What Drafters Must Know


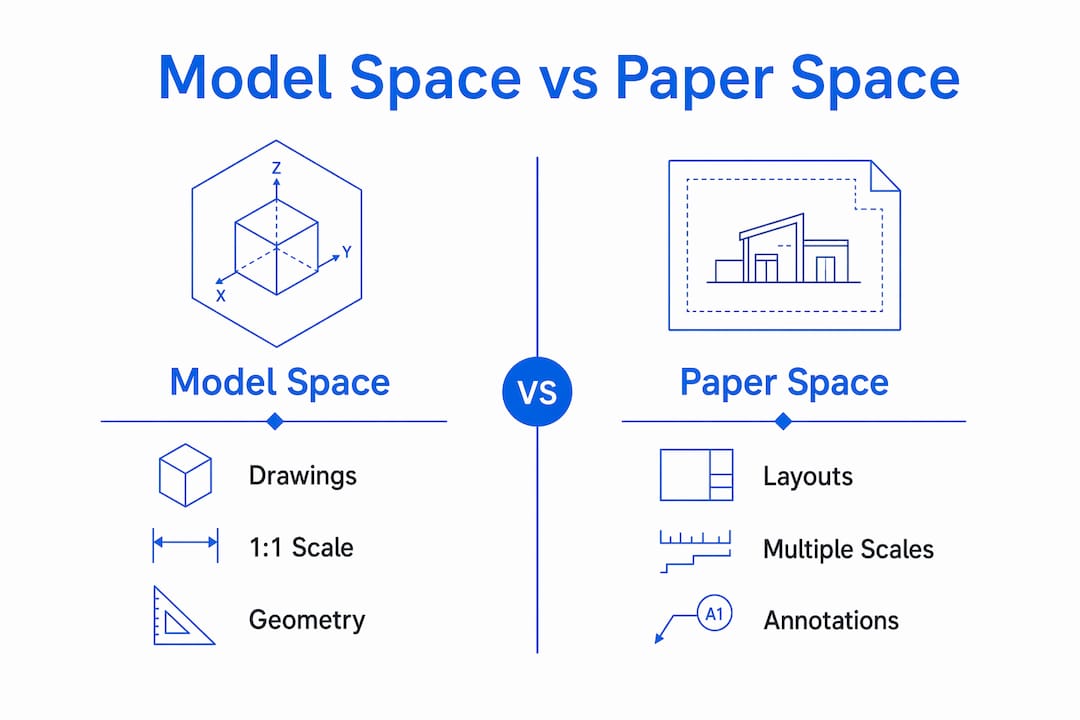
Draw all real-world geometry in Model Space at 1:1 scale. Compose your sheets, place viewports, and add annotations in Paper Space. That single rule, applied consistently, eliminates most scaling headaches and keeps your files clean across every project. According to Autodesk’s official documentation, Model Space is a limitless 3D coordinate environment for drafting geometry at true scale, while Paper Space is the 2D sheet environment where you arrange viewports and annotations at printed sizes.
Quick reference:
Where to draw: Model Space, always at 1:1 real-world units
Where to annotate: Paper Space (the Trans-Spatial method), or use annotative styles in Model Space for specialized workflows
Where to place title blocks and schedules: Paper Space layouts only
How to switch: Click the Model or Layout tabs at the bottom of the screen, double-click inside a viewport to enter Model Space, double-click outside to return, or type MSPACE / PSPACE at the command line
How to lock a viewport: Select the viewport border, right-click, and choose “Display Locked → Yes” immediately after setting the scale
Table of Contents
What is Model Space and how should you use it?
Model Space is where the actual project lives. Think of it as an infinite drafting table with no edges: you draw floor plans, elevations, sections, 3D solids, site geometry, and every other real-world object at its true physical size. A wall that is 20 feet long gets drawn as 20 feet. A structural beam 600mm deep is drawn 600mm deep. No scaling, no conversion.
That 1:1 principle is not just a convention. It means every measurement you take in Model Space is a real-world measurement, which makes coordination between disciplines reliable and eliminates the mental arithmetic that plagued early CAD workflows.
Civil 3D users will recognize that corridors, alignments, and grading objects live natively in Model Space as well. Those objects carry their own label styles and annotation behaviors, which is why Civil 3D workflows sometimes require a hybrid approach. For standard AutoCAD architectural and mechanical drafting, though, the rule is clean: if it exists in the physical world, it belongs in Model Space.
When does annotation belong in Model Space? Occasionally. If you are working on a single-scale drawing and never intend to present it at multiple scales, annotating in Model Space with a manually scaled text height is workable. Some annotative text and dimension styles can also live in Model Space and scale automatically per viewport. But for most professional deliverables, those approaches add complexity without a meaningful payoff. The AutoCAD 2D versus 3D drafting decision affects this choice too: 3D model-space annotation is particularly prone to scale and associativity problems.
What is Paper Space (Layout) and why does it exist?
Paper Space is the sheet. It maps directly to a physical piece of paper: one unit in Paper Space equals one unit on the printed page. When you switch to a Layout tab, you are looking at a representation of that sheet, and everything you place there, title blocks, viewport frames, notes, dimensions, schedules, sits at its final printed size.
The critical mental shift is this: Paper Space is not a smaller version of Model Space. It is a completely different working environment with a different coordinate system and a different purpose.
Paper Space exists because Model Space was never designed to be a presentation environment. Placing a title block in Model Space and scaling it to match a 1/4" = 1’-0" plot means your border is 144 feet long in model coordinates. Paper Space eliminates that problem entirely by keeping sheet objects at paper scale from the start.
Each Layout tab can hold multiple viewports, each showing a different part of the model at a different scale. A single sheet can display a 1:100 floor plan, a 1:20 detail, and a 1:50 elevation side by side, all pulling from the same Model Space geometry. That flexibility is the core reason professional standards favor Paper Space for annotations and sheet composition.
A practical example: an architectural sheet for a residential project might have a viewport at 1/4" = 1’-0" showing the full floor plan, a second viewport at 3/4" = 1’-0" showing a bathroom detail, and a third at 1/8" = 1’-0" showing a site plan. All three pull from the same model. Change the wall in Model Space and every viewport updates automatically.

How do viewports and scaling work in Paper Space?
Getting viewport scale right is where most new drafters stumble. The sequence matters, and skipping a step causes the kind of scale mismatch that only shows up at plot time.
Step-by-step viewport workflow
Switch to a Layout tab. If no layout exists, right-click the Model tab and select “New Layout.”
Create a viewport using the MVIEW command (or go to the Layout ribbon and choose Rectangular Viewport). Draw the viewport boundary where you want the view to appear on the sheet.
Double-click inside the viewport to activate it and enter Model Space through the viewport.
Set the viewport scale using the scale dropdown in the status bar (bottom right of the screen). Common architectural scales: 1/4" = 1’-0", 1:100, 1:50. The model zooms to match.
Pan to center the view you want to display. Do not zoom — zooming changes the scale.
Lock the viewport immediately. Select the viewport border from Paper Space, right-click, and choose “Display Locked → Yes.” Locking prevents accidental pan or zoom from shifting the scale during editing. This is one of the simplest, highest-impact habits for reliable plotting.
Set layer visibility per viewport (covered in the next section).
Return to Paper Space by double-clicking outside the viewport, then add annotations, dimensions, and notes directly in Paper Space.
Pro Tip: After locking a viewport, verify the scale by clicking the viewport border and checking the “Standard Scale” property in the Properties palette. If it reads “Custom,” the scale is not a standard ratio and will likely cause dimension inconsistencies.
Annotative scaling is an alternative worth knowing. Annotative text and dimension styles, when configured correctly, scale automatically with the viewport they appear in. This is useful for firms that annotate in Model Space and need the same note to display at the correct printed height across multiple viewport scales. The trade-off: annotative styles require careful setup, and incorrect configuration produces inconsistent printed sizes. For most everyday drafting, placing annotations directly in Paper Space is simpler and more predictable.
Where should you put dimensions and text?
The short answer: Paper Space, almost always. The longer answer involves understanding why, and knowing the exceptions.
Dimensioning in Paper Space is the most reliable approach, particularly when working with 3D models and floating viewports. Model Space dimensions can lose associativity or scale incorrectly across viewports, which means a dimension that looks correct in one viewport may display the wrong value in another. Paper Space dimensions, set with a dimension scale of 1, always reflect what you see on the sheet.
The Autodesk blog recommends adding dimensions and text in Paper Space to avoid scaling concerns, and that recommendation holds up in practice.
Method | Accuracy | Maintainability | Multi-scale output | File cleanliness |
Paper Space annotation (Trans-Spatial) | High — dim scale = 1, no math | Easy — one set of annotations | Excellent — each viewport independent | Clean model, annotations on layout |
Model Space annotation (manual scale) | Moderate — requires inverse scale math | Harder — must update scale if plot scale changes | Poor — one scale only | Cluttered model |
Annotative objects in Model Space | High when set up correctly | Moderate — annotative styles must be managed | Good — auto-scales per viewport | Moderate — annotations in model |
For everyday architectural and mechanical drafting, Paper Space annotation wins on every dimension that matters for a production environment. Annotative Model Space objects make sense in specific scenarios: Civil 3D label styles that are geometry-linked, 3D annotation that must follow a surface, or firms with an established annotative workflow they are not ready to migrate. If you are starting fresh, go Trans-Spatial.
How do you control what shows in each viewport?
Layer visibility per viewport is one of the most powerful tools in AutoCAD, and one of the least understood by intermediate users. The key mechanism is Viewport Freeze (the VP Freeze column in the Layer Manager), which hides a layer in the active viewport without affecting any other viewport or Model Space.

To freeze a layer in a specific viewport: double-click inside the viewport to activate it, open the Layer Manager, find the layer you want to hide, and click the sun/snowflake icon in the VP Freeze column. That layer disappears in this viewport only. Every other viewport and Model Space remain unaffected.
This is how you show structural elements in one viewport and hide them in a detail viewport. It is also how you present a demolition plan and a new-work plan from the same model on the same sheet. For a deeper look at setting up layer standards that support this workflow, the AutoCAD layer standards guide covers naming conventions and VP Freeze strategies in detail.
Layer states take this further. A named layer state saves the current visibility, freeze, lock, and color settings for every layer. You can create a “Demolition” state and a “New Work” state, then switch between them per layout without manually toggling individual layers. For large projects with many layouts, layer states are a significant time saver.
Pro Tip: Create a dedicated layer called “Viewports” or “VP-Border” and place all viewport objects on it. Before plotting, freeze that layer in the page setup or plot dialog. The viewport borders disappear from the print without affecting any model content.
Viewport color and linetype overrides are also available per viewport, letting you change how a layer displays in one view without altering the model. Use these sparingly: overrides that are not documented in a layer standard become a maintenance problem when someone else opens the file.
How do you compose and plot a finished sheet?
A finished sheet is the result of a deliberate sequence, not a collection of viewports dropped onto a layout. Here is the workflow that produces consistent output.
Place the title block in Paper Space as a block reference. The title block defines the sheet boundary and should sit at paper units (1:1 in Paper Space).
Create viewports inside the title block border using MVIEW. Position them to match your intended layout.
Set each viewport’s scale using the status bar scale dropdown. Lock immediately after.
Apply viewport layer visibility using VP Freeze to control what each viewport shows.
Add Paper Space annotations: notes, dimensions, schedules, and revision clouds go directly in Paper Space at a text height matching your plotted size (typically 3/32" or 1/8" for architectural sheets).
Attach a page setup. Right-click the Layout tab, choose “Page Setup Manager,” and configure paper size, plot style table (CTB or STB), and orientation. Layouts save page setups so you can reuse them across sheets and projects.
Preview before plotting. Use PLOT and click “Preview” to catch viewport border visibility, lineweight issues, and text that falls outside the printable area.
Plot or publish. Use PUBLISH to batch-plot multiple layouts to PDF in one operation.
Before you plot, verify:
All viewports are locked
The correct plot style table (CTB/STB) is attached
Paper size and orientation match the title block
The Viewports layer is frozen in the plot settings
Lineweights display correctly in preview
Reusing page setups across a project is one of the fastest ways to enforce drawing standards. Set up one layout correctly, save the page setup with a descriptive name, and import it into every other layout in the project. For a full architectural sheet setup walkthrough, the AutoCAD architectural drawing setup guide covers templates and page setup management step by step.
What are the most common mistakes and how do you fix them?
Scale mismatch is the most frequent problem, and it almost always traces back to one of three causes: the viewport was not locked after the scale was set, the annotation scale was not matched to the viewport scale, or the wrong plot style was attached to the layout.
Viewport scale not locked. You set 1/4" = 1’-0", then accidentally scrolled inside the viewport while editing. The scale is now custom and your dimensions are wrong. Fix: double-click inside the viewport, type ZOOM then 1/48XP (for 1/4" = 1’-0") to reset the scale precisely, then lock immediately. Check the Properties palette to confirm the scale reads as a standard ratio.
Annotative text not displaying. Annotative objects only appear in viewports whose annotation scale matches the object’s assigned scale. If your text is invisible in a viewport, check the viewport’s annotation scale in the status bar and compare it to the annotative scales assigned to the text object. Add the matching scale or switch the viewport scale to match.
Dimensions losing associativity. This happens when model geometry is moved or deleted after dimensions are placed in Model Space. Paper Space dimensions with DIMASSOC set to 2 maintain associativity through the viewport. If a dimension shows the wrong value, check whether the referenced geometry still exists and whether the dimension was placed in the correct space. For a broader look at drafting errors and fixes, the common AutoCAD drafting mistakes guide covers associativity and other frequent problems.
Wrong plot style attached. A layout using a monochrome CTB file when the project standard calls for a color STB will produce unexpected lineweights. Check the plot style table in Page Setup Manager and confirm it matches the project template.
MSLTSCALE and PSLTSCALE. If dashed linetypes look wrong in viewports, check these system variables. PSLTSCALE set to 1 scales linetypes relative to Paper Space units, which is usually correct. MSLTSCALE set to 1 scales model-space linetypes by the annotation scale, which can cause linetypes to appear too large or too small in certain viewport configurations.
How do you switch between Model Space and Paper Space?
Knowing the commands and visual cues saves time and prevents the accidental edits that happen when you are in the wrong space.
Click the Model tab at the bottom of the screen to go directly to Model Space.
Click a Layout tab to switch to Paper Space on that layout.
Double-click inside a viewport while on a Layout tab to activate Model Space through that viewport. The viewport border thickens to indicate you are now editing the model.
Double-click outside all viewports (on the gray sheet area) to return to Paper Space.
Type MSPACE at the command line to enter the model through the active viewport (same as double-clicking inside).
Type PSPACE to return to Paper Space from inside a viewport.
Use the PAPER / MODEL toggle on the status bar (bottom left) as a quick toggle when a layout is active.
Confirming which space you are in:
Status bar shows “MODEL” or “PAPER”
The active viewport border is thick when you are inside it
The UCS icon changes appearance between spaces
The Layout tab name is highlighted when you are on a layout
The most common accidental edit happens right after double-clicking into a viewport: the mouse wheel zoom changes the viewport scale before the viewport is locked. Get into the habit of locking the viewport before doing any editing inside it, or use PSPACE to return immediately if you notice the scale has shifted. The MSPACE and PSPACE commands are faster than mouse navigation once they become muscle memory.
S15studio’s recommended workflow and checklist
The workflow that Steve teaches at S15studio follows a single organizing principle: keep the model clean and let Paper Space handle everything that belongs on a sheet. Experienced CAD instructors phrase it this way: “Everything that is a real-world object goes in Model Space; everything that is a sheet or print artifact goes in Paper Space.”
Full project workflow:
Draw all geometry in Model Space at 1:1 real-world units
Create Layout tabs for each sheet in the deliverable set
Place the title block as a block reference in each layout
Create viewports using MVIEW and position them within the title block
Set each viewport’s scale and lock it immediately
Apply VP Freeze per viewport to control layer visibility
Add all annotations, dimensions, notes, and schedules in Paper Space
Use annotative styles where multi-scale annotation is required
Attach a saved page setup to each layout
Run a plot preview before final output
Publish all layouts to PDF using PUBLISH
Pre-plot checklist:
[ ] All viewports locked
[ ] Viewport borders layer frozen
[ ] Correct plot style table attached
[ ] Paper size and orientation confirmed
[ ] Annotation scale matches viewport scale
[ ] Lineweights verified in preview
[ ] Title block attributes filled in
Pro Tip: Build a project template with pre-defined layout tabs, a title block block reference, a “Viewports” layer, saved page setups, and a preconfigured set of annotative styles. Starting every project from this template means you spend time on design, not setup.
Steve Fagan is an Autodesk Certified Trainer and the founder of S15studio, which publishes instructor-led AutoCAD and Revit training with project-based exercises and viewport/layout templates built into every course.
Key Takeaways
Draw in Model Space at 1:1, compose and annotate in Paper Space via locked viewports, and lock every viewport immediately after setting its scale to prevent the scale drift that causes most plotting failures.
Point | Details |
Model Space is for geometry | Draw all real-world objects at 1:1 scale; never scale geometry to match a plot size. |
Paper Space is for sheets | Place title blocks, annotations, dimensions, and schedules in Paper Space at paper units. |
Lock viewports immediately | Set the viewport scale, then lock it before editing anything else to prevent accidental scale changes. |
VP Freeze controls per-viewport visibility | Freeze layers per viewport to show different model content on each sheet without touching the model. |
S15studio training covers this workflow | The AutoCAD masterclass includes viewport/layout templates and project-based exercises for mastering this workflow. |
Why the annotation question matters more than most instructors admit
The model-space-vs-paper-space debate sounds like a setup preference. It is not. The annotation decision is where projects either stay maintainable or quietly accumulate technical debt that surfaces at the worst possible moment, usually during a revision cycle or a handoff to another firm.
The conventional wisdom in many offices is still “annotate in Model Space with annotative styles.” That works, until it does not. Annotative styles require every team member to manage annotation scales correctly, and one person who forgets to assign the right scale to a text object creates invisible annotations that only show up in the wrong viewport. The Trans-Spatial method, annotating directly in Paper Space with a dimension scale of 1, removes that variable entirely.
What most classroom instruction misses is the why behind the recommendation. Students learn the steps but not the failure mode. The failure mode for model-space annotation is subtle: everything looks correct on screen, the dimensions read the right values, and the text looks the right size. Then someone changes the viewport scale for a revision, and suddenly half the annotations are the wrong size or disappear. Paper Space annotation does not have that failure mode because the annotations are not connected to the viewport scale at all.
For Civil 3D users, the picture is more complicated. Label styles that are geometry-linked genuinely need to live in Model Space, and those labels do behave correctly across viewports when the styles are set up properly. But even in Civil 3D, sheet-level notes, general dimensions, and title block data belong in Paper Space. The hybrid approach, model-space labels for live data and paper-space annotations for everything else, is the right call for that workflow.
The practical takeaway: default to Paper Space annotation, document any exceptions in your drawing standards, and build those standards into your project template so the decision is made once, not every time someone opens a new sheet.
Master this workflow with S15studio training
If the viewport and annotation workflow described here is the kind of thing you want to practice on real project files rather than read about, S15studio’s AutoCAD training is built exactly for that.

The Mastering AutoCAD course covers the full Model Space to Paper Space workflow with project-based exercises, pre-built viewport and layout templates, and direct instructor feedback from Steve Fagan, an Autodesk Certified Trainer. You work through real deliverables: setting up layouts, configuring viewport scales, applying VP Freeze, and producing plot-ready PDFs. The course is structured so you build the habits, not just the knowledge. Architecture and planning professionals looking for industry-specific layout examples can also find relevant context at ksign.co’s architecture solutions. Ready to stop guessing at viewport scales? Start the AutoCAD masterclass and get your first layout right.
Useful sources and further reading
About Model Space and Paper Space — Autodesk Help: official product definition and switching instructions
Documentation in AutoCAD — Autodesk Learn: Autodesk’s own tutorial on the Trans-Spatial annotation method and layout workflows
Advanced Plotting and Layouts — EECAD/JEFF Lab: practitioner-level notes on annotation placement, MSPACE/PSPACE commands, and professional standards
Layouts — Introduction to Drafting and AutoCAD (NVCC Pressbooks): clear academic introduction to layouts, page setups, and viewport layer controls
Getting Started with AutoCAD — S15studio: beginner-friendly primer on core AutoCAD concepts including Model and Paper Space
AutoCAD Layer Standards Setup — S15studio: layer naming conventions and VP Freeze strategies for architectural projects
AutoCAD Drawing Standards Explained — S15studio: annotation workflows and template standards for design professionals
Mastering AutoCAD: The Ultimate Guide from Beginner — S15studio: project-based AutoCAD training covering the full layout and plotting workflow
Recommended
Comments