
Link by Default: Revit CAD Import Checklist for Designers & Students


Link CAD in Revit is the right default for almost every workflow. It keeps an external reference that updates when the source file changes and won’t drag down performance the way importing can. Import only when you need static, embedded geometry, like tracing a site survey into a family. Both tools live under Insert → Link CAD or Insert → Import CAD, but clean your DWG or DXF first, or you’ll be fixing problems for weeks.
TL;DR:
Linking CAD files is recommended for ongoing updates, collaboration, and large projects, while importing is better for static, one-time needs.
Clean your CAD files thoroughly before import, including purging unused layers and simplifying complex hatches, to prevent geometry and performance issues.
Always set the correct units during import and verify scale with known dimensions to avoid mismatches that can cause costly rework.
Exploded CAD geometry can significantly bloat project files and reduce performance, so use tracing instead and explode only in controlled, test environments.
Regularly update and manage linked CAD files, avoiding re-imports, to maintain project coordination and prevent model misalignment.
Table of Contents
What Changes in the Revit Model: Import vs. Link CAD
The two tools produce very different outcomes inside your project, and picking wrong is one of the most common causes of a bloated, sluggish Revit file. Linking keeps the CAD data external. Revit references it like a window into another file. It updates automatically when the source changes and it doesn’t add new imported categories to your model, which is a big reason linking is generally the recommended approach for ongoing coordination work.
Importing does the opposite. It embeds the geometry directly into the Revit file, which means you can explode it, edit pieces of it, or convert it into native elements. That flexibility comes at a cost: larger file sizes, slower regeneration, and no automatic updates when the original CAD file changes.
Use this checklist when you’re deciding:
Link CAD for consultant backgrounds, survey data, or anything that will keep changing throughout the project.
Import CAD for one-off details, static reference geometry, or content you’re building into a family.
Import CAD when you specifically need to explode the geometry into Revit lines, or trace over it to build native walls and floors.
Link CAD whenever more than one person on the team needs the same up-to-date reference.
Supported CAD Formats and Where to Find the Tools
Revit’s Import CAD tool sits on the Insert tab, in the Import panel, right next to Link CAD. Both open a similar dialog, but the buttons commit to fundamentally different outcomes, so double check which one you clicked before you hit Open.
Revit accepts a wide range of file types, including DWG, DXF, DGN, SAT, OBJ, Rhino 3DM, STEP, SKP, STL, and FormIt’s AXM format. Inside the dialog, look for two settings before you click Open:
Files of type at the bottom, which filters what Revit will even show you in the folder.
Colors, Layers, Positioning, and Units, all set from dropdown menus on the same screen.
3D formats like STEP, OBJ, and 3DM import fine for most geometry, but complex SubD meshes can import incompletely or behave unpredictably once inside Revit. Test unfamiliar 3D files in a throwaway project before committing them to live work.
How to Prepare a CAD File Before Importing It
A clean file bought at the source saves hours of cleanup inside Revit. Cleaning a DWG before bringing it into Revit prevents most of the common headaches that show up later as missing geometry, weird line weights, or bloated file size.
Work through this before opening the Insert dialog:
Duplicate the original DWG or DXF. Never touch the source file your consultant sent.
Purge unused blocks, layers, and styles inside AutoCAD (type PURGE, repeat until nothing’s left to remove).
Delete or freeze layers you don’t need in Revit, especially dimension, text, and title block layers.
Simplify complex hatches and line types. Revit doesn’t need decorative fills that were meant for plotting.
If the file came from AutoCAD Architecture or AutoCAD MEP, set Proxygraphics to 1 before export so those objects come through correctly rather than showing up as empty geometry.
Export a stripped down version specifically for family imports, keeping only the layers relevant to that component.
Pro Tip: Keep a documented layer map alongside your cleaned DWG. When a consultant sends a revised file six weeks later, you’ll cut the same layers in half the time instead of re-guessing what mattered.
Step-by-Step: Importing or Linking CAD Into Revit
Open the view or family where the CAD needs to live first. Working in the wrong view is the single most common setup mistake, especially with drafting views and floor plans that look similar at a glance.
Go to Insert → Link CAD (for referenced files) or Insert → Import CAD (for embedded geometry).
Browse to your cleaned file and check Files of type to confirm you’re loading the right format.
Set Positioning: choose “Center to center” for quick placement, “Origin to internal origin” when the CAD file shares your project’s coordinate system, or “By shared coordinates” for multi-discipline projects using a survey point.
Set Layers/Levels to All, Visible, or Specify, depending on how much of the file you actually need.
Choose a Colors option: Invert, Preserve, or Black and White, based on how the geometry needs to read in your views.
Set Units explicitly rather than trusting Auto Detect, particularly with files from international consultants where metric and imperial mix-ups are common.
Check or uncheck Current view only depending on whether you want the CAD visible everywhere or confined to one view.
Click Open.
For quicker placement, you can skip the Insert tab entirely and drag the file straight from Windows Explorer into an open model, drafting, or sheet view. If you’re building a family, import into the family editor rather than the project so the geometry stays scoped. Reserve partial explode for cases where you genuinely need Revit-native lines, and test it in a separate file first.
Why Your Imported CAD Isn’t Showing Up
Missing CAD geometry is almost always one of three problems, and they’re all fast to check once you know where to look.
Open Visibility/Graphics Overrides and check the Imported Categories tab. It’s easy for a layer to get switched off without anyone noticing.
Confirm Current view only wasn’t accidentally checked during import, which would hide the file from every other view in the project.
Check your view range and far clip offset. Geometry sitting above or below the current cut plane won’t render even though it imported successfully.
Use Zoom to Fit (type ZF or use the View tab). If nothing shows up, the geometry may be sitting far from the project origin, sometimes miles away in Revit’s coordinate space.
If it’s a linked file, open Manage Links, then reload or relink if the source path or file has moved.
These four checks solve the vast majority of “missing CAD” support questions, usually in under two minutes once you know the order to check them in.
Performance Risks: Why You Should Think Twice Before Exploding CAD
Exploding an imported CAD file feels harmless in the moment. It isn’t. Each line, hatch, and block reference gets converted into individual Revit elements, and a moderately detailed floor plan can generate thousands of them in seconds. That’s how a 40 MB project file becomes a 400 MB project file, and why models that started fast end up crawling by month six.
Trainers generally recommend linking plus tracing over exploding whenever you need Revit-native geometry, since tracing gives you clean walls, floors, and lines instead of thousands of disconnected fragments. If you must explode something, do it in a separate test file first and confirm the element count is manageable before touching your live model.
Housekeeping habits that prevent bloat:
Remove imported categories you’re no longer using from Visibility/Graphics.
Unload CAD links you don’t need in the current phase rather than leaving them active.
Keep a single, current layer map so nobody re-imports a messy version of the same file six months from now.
Pro Tip: Before exploding anything, check the element count Revit reports in the warning dialog. If it’s in the thousands, close the dialog and reconsider whether tracing would get you the same result with a fraction of the file weight.
Trainer-Tested Shortcuts for Cleaner CAD Imports
A few habits separate the designers who bring in CAD calmly from the ones who spend an afternoon untangling a mess.
Start every new file type in a small test project, not your live model. It costs five minutes and saves hours if the geometry comes in wrong. Keep a permanently clean copy of any recurring DWG, like a standard title block or site base, so you’re never re-cleaning the same file twice. If you’re importing something you plan to explode, do it in a dedicated drafting view rather than a model view. It keeps the fragments contained and easy to delete if the result isn’t usable.
When layers come in messy but you don’t want to delete anything permanently, use the Query tool to select and hide specific pieces of imported geometry instead. It’s reversible, which matters when a consultant asks why something disappeared three weeks later.
Some training providers build structured practice around exactly these habits, with downloadable checklists and real project files so you’re troubleshooting in a controlled exercise instead of live client work. That distinction, practicing on a sandbox file versus learning the hard way on a deadline, is usually what separates a fast learner from a frustrated one.
Working With 3D CAD Geometry and Its Limits in Revit
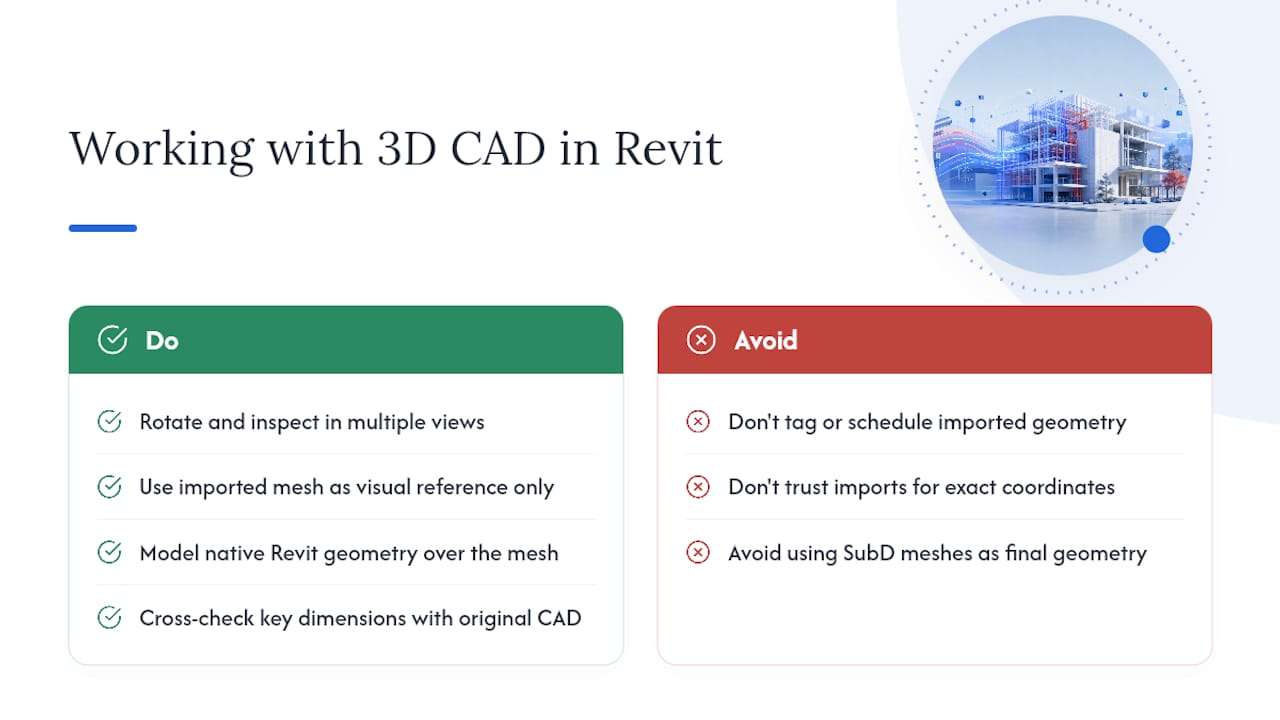
Three-dimensional CAD files behave differently from flat DWG plans, and the gap catches a lot of people off guard the first time they try it. Formats like SAT, STEP, OBJ, and Rhino’s 3DM bring solid or surface geometry into Revit, either through Import CAD or the dedicated Import 3D Shape tool depending on the version you’re running.
The geometry that survives the trip usually consists of clean solids, NURBS surfaces, or simple polygon meshes. Where things fall apart is with complex SubD (subdivision surface) meshes, the kind common in organic, sculpted Rhino or SketchUp models. Those can import incompletely, with faces missing or geometry distorted in ways that aren’t always obvious until you rotate the view.
Once inside Revit, imported 3D geometry is essentially inert. You can see it, reference it, and build around it, but you can’t tag it as a wall or schedule it as a door. If a facade panel or custom canopy needs real Revit intelligence, treat the imported mesh as a visual reference only, then model native Revit geometry over the top of it.
For anything mission critical, like a curved roof geometry that needs to hit exact structural coordinates, don’t trust the import blindly. Cross check a handful of key dimensions against the original CAD file before you build anything downstream from it. A distorted mesh that looks fine in a shaded view can be off by inches in ways that only show up once you’re dimensioning against it.
Fixing Scale Mismatches Between CAD and Revit
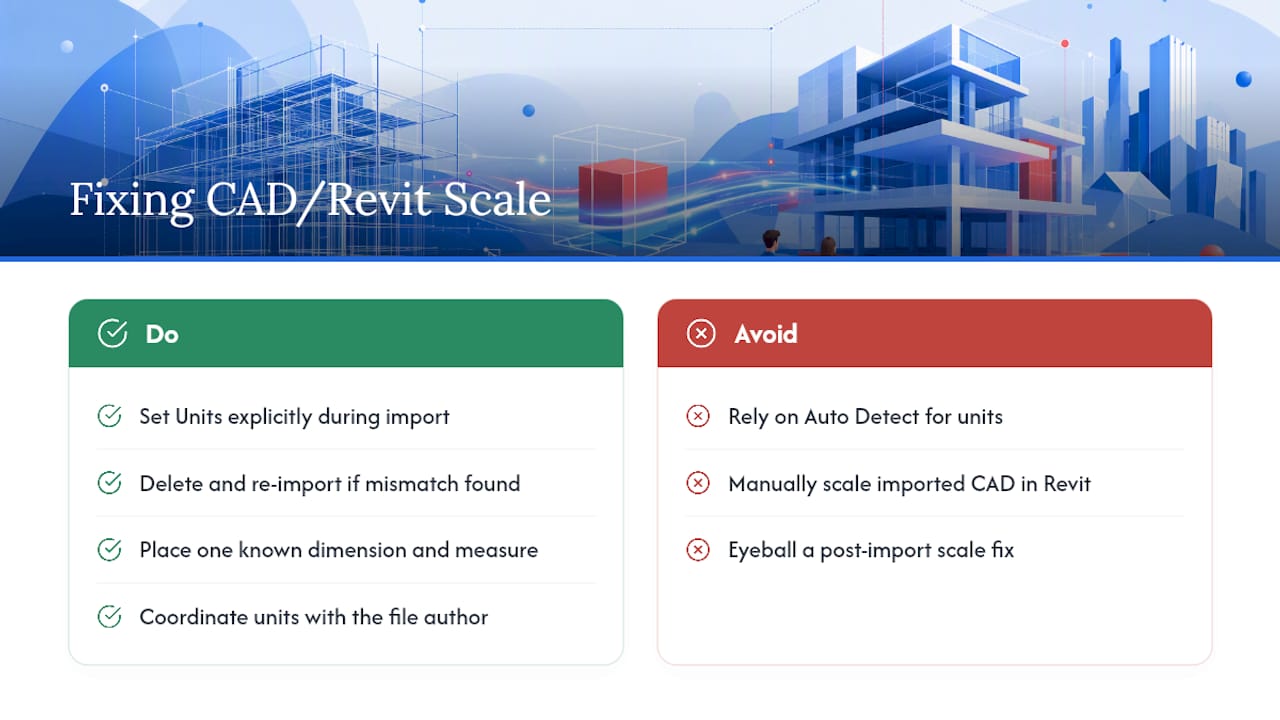
Scale problems show up constantly, and they almost always trace back to one root cause: the CAD file and the Revit project don’t agree on what a “unit” means. AutoCAD files are frequently drawn in millimeters when the drafter intended meters, or in unitless generic drawing space with no scale baked in at all.
The fix starts in the import dialog, not after the fact. Set the Units field explicitly during import rather than relying on Auto Detect, especially with files from international consultants or older projects where the drafting convention isn’t obvious. If a file comes in ten times too large or ten times too small, that’s almost always a units mismatch, not a geometry problem.
If you’re catching the mismatch after import, don’t try to eyeball a fix. Delete the import, correct the units setting, and bring it in again. Manually scaling imported CAD geometry inside Revit is unreliable and tends to create geometry that’s subtly wrong in ways that are hard to catch until a dimension string doesn’t add up.
For linked files specifically, coordinate the units conversation with whoever produced the source file before it ever reaches you. A five-minute conversation about drawing units at the start of a project saves the scramble of resizing everything three weeks before a deadline. When in doubt, place one known dimension (a door width, a grid spacing) immediately after import and measure it in Revit to confirm the scale landed correctly before you build anything on top of it.
Keeping CAD Imports and the Revit Model in Sync
Coordination breaks down the moment nobody owns the relationship between the CAD source file and the Revit model that references it. The fix isn’t complicated, but it requires discipline that’s easy to skip under deadline pressure.
Linked files should stay linked, not get re-saved as new imports every time a consultant sends an update. Use Manage Links to reload the existing link rather than importing a fresh copy, which keeps positioning and settings intact instead of forcing you to reposition everything from scratch.
Establish a naming and version convention with consultants early, something as simple as a date stamp in the filename, so everyone on the project knows which CAD version is currently linked without opening Revit to check. When a consultant confirms a file is final, note that in your project log so the next person doesn’t waste time reloading a link that’s already current.
For projects with multiple disciplines linking the same survey or site file, agree on shared coordinates once, at the start, rather than letting each team position the CAD independently. Mismatched coordinate systems across disciplines cause far more rework than almost any other coordination failure on a BIM project. Revisit that shared coordinate setup any time a major revision comes through, since even a small shift in the source file’s origin point can throw off everyone downstream who’s referencing it.
When Training Is Worth It: The Trainer’s View
Ad hoc learning works fine for a single DWG import. It falls apart on multi-discipline projects where five people are importing CAD five different ways and nobody’s file behaves the same. Teams with real standards, and students heading into practice, get more out of a short structured course than months of trial and error, mostly because it cuts down on the repeated mistakes that quietly wreck model health over time.
— Steve
Want Guided Practice Instead of Trial and Error?
Everything above works, but reading about CAD cleanup is different from doing it under a deadline with a consultant’s messy DWG staring back at you. S15studio’s Revit Introduction course gives you a structured, low-stakes way to practice import and link workflows before they matter on a real project, for 20 EUR one off. If you’re starting from scratch or want the full path from beginner to advanced, the Revit Course Only package runs 79 EUR one off and includes project-based exercises, direct trainer support, and lifetime access to the materials, so you’re not re-buying content every time Revit updates. For readers who need to clean up CAD files at the source before they ever touch Revit, the AutoCAD Training course, also 79 EUR one off, covers the layer and file prep habits that make every import downstream easier. Pick the course that matches where you’re stuck and start there.
Sources
Autodesk’s own documentation covers the mechanics in full: the import versus link overview, the supported formats and Import CAD location, and the troubleshooting guide for missing geometry. For a practical walk-through with extra screenshots, LazyBim’s import guide covers the same ground from a working designer’s perspective.
About importing or linking CAD files (Autodesk)
FAQ
Can You Import Revit Files Into CAD?
Not directly. Revit files export to DWG or DXF using the Export command, and that DWG can then be opened in AutoCAD or any CAD program. If you’re regularly exporting Revit models for consultants, S15studio’s DWG export guide covers three setups that keep the output clean.
What’s the Difference Between Link CAD and Import CAD in Revit?
Linking keeps the CAD file as an external reference that updates automatically and doesn’t add new imported categories to your model. Importing embeds the geometry permanently, which lets you explode or edit it but increases file size and cuts your ties to the source file’s updates.
Why Is My Imported CAD Not Showing in Revit?
The most common causes are a hidden Imported Categories layer, an accidentally checked “Current view only” option during import, or geometry sitting outside your current view range. Zoom to Fit usually reveals geometry that imported successfully but landed far from the project origin.
How Do I Find an Imported CAD File in Revit?
Open Visibility/Graphics Overrides and check the Imported Categories tab to confirm the file is turned on for that view. If it’s not visible anywhere, select it from the Project Browser under Families if it was imported into a family, or use Zoom to Fit in a plan view to locate stray geometry.
Does S15studio Teach Revit CAD Import Workflows?
Yes. S15studio’s course library, including the Revit Introduction and full Revit Course Only packages, covers CAD import and link workflows as part of its project-based training with direct trainer support. Current pricing and course details are listed on the S15studio site.
Recommended
Comments