
Revit Cloud Worksharing: 5 Mbps and 5 Habits to Prevent Sync Failures
- Steve Fagan

- 3 days ago
- 11 min read

Revit Cloud Worksharing lets Revit-licensed team members co-author the same model in the cloud, provided your firm holds an active Autodesk BIM Collaborate Pro subscription. There’s no server hardware to maintain and no VPN tunnel to babysit. You get concurrent editing, a centralized common data environment, and far less of the rework that comes from stale local files.
TL;DR:
All team members must have an active BIM Collaborate Pro license and use matching Revit versions to avoid sync errors and upgrade prompts.
Setting up the project folder structure, permissions, and worksets correctly before inviting collaborators helps prevent access issues and project delays.
Regularly creating fresh local copies, practicing small syncs, and scheduling publish checkpoints improve model stability and avoid clutter.
Keeping network bandwidth above 5 Mbps per user and using wired connections reduces sync failures and improves performance during concurrent workflows.
Consistent team discipline—daily local copies, scheduled publishing, relinquishing worksets—determines the success of cloud worksharing more than the tool itself.
Table of Contents
What Is Revit Cloud Worksharing (And When Should You Use It)?
A traditional central model sits on a server in your office, and remote users connect through a VPN that punishes anyone more than a few hundred miles away. Revit cloud worksharing replaces that server with a model hosted on Autodesk Docs, so every team member connects through the same cloud infrastructure regardless of location. Latency evens out. A consultant in another time zone gets roughly the same experience as someone sitting in the next office.
This setup fits distributed offices, multi-discipline joint ventures, and any project where architects, structural engineers, and MEP consultants need to touch the same model without shipping files back and forth. It’s not universal, though. Only users with a Revit license and a seat on the project can edit the live model directly. Anyone outside that circle, like a client or contractor reviewing progress, needs a published snapshot rather than direct access. That distinction shapes almost everything else in this guide.
What Do You Need Before You Start (Licensing and Prerequisites)?
Revit Cloud Worksharing is a capability of Autodesk BIM Collaborate Pro, not a feature you unlock separately, so every team member who will co-author the model needs an active BIM Collaborate Pro entitlement tied to their Autodesk account. Without it, they can view published content but can’t open the live model.
You also need an Autodesk Docs project already set up, with the right folder structure and permissions assigned to each collaborator before anyone tries to open the model. Project admins control who gets edit access versus view-only access, and getting this wrong early causes access headaches later.
Two smaller checks matter more than people expect. First, confirm everyone is running a matching Revit build. Mismatched versions cause upgrade prompts and sync failures that look like bugs but are really version conflicts. Second, check that your office network can sustain the connection under real project load, which the performance section below covers in detail.
How Do You Start a Revit Cloud Workshared Model?
Getting a project into cloud worksharing takes a specific sequence, and skipping a step is the most common reason teams get stuck on the first day.
Create or confirm your Autodesk Docs project. Set up the project folder structure first, with a dedicated Projects folder for the live model and appropriate team permissions already assigned.
Open Revit and start the cloud model. From the Collaborate tab, select Collaborate, then choose “In the cloud” and save the model directly into the Projects folder on Autodesk Docs. This step converts the file into a cloud-hosted central model.
Enable worksets before inviting others. If your project needs discipline-based or zone-based worksets, set those up now, while the model has a single author, to avoid renaming or restructuring worksets after the team is already editing.
Invite team members with the correct permissions. Add collaborators through Autodesk Docs, matching their access level (editor versus viewer) to their actual role on the project.
Open the model from Revit’s Home screen. Once invited, team members find the cloud model listed under their recent or cloud projects on the Revit Home screen, and opening it creates their own local cache automatically.
Get this sequence right once and every future project setup goes faster, because the folder structure and permission logic rarely change project to project.
What Does a Normal Day Look Like Inside a Cloud Model?
Every team member should create a fresh local copy at the start of each working day rather than reopening yesterday’s cache indefinitely. Revit only transmits the differences, or deltas, between your local cache and the cloud central model, so a clean cache keeps those sync operations fast and predictable.
Two commands get confused constantly, and the mix-up causes real problems: Synchronize is internal. It pushes your changes to the cloud central model so your Revit-licensed teammates see them on their next Reload Latest. Publish is external. It creates a versioned, view-only snapshot in Autodesk Docs that clients, contractors, and other non-Revit stakeholders can review in a browser. Publishing too often creates version clutter for stakeholders who don’t need to see every hour’s changes.
A few habits keep the model stable:
Watch the Sync Activity Indicator so you know when teammates are actively synchronizing before you attempt a large operation.
Reload Latest before starting significant work, not just at the start of the day.
Relinquish worksets and borrowed elements before stepping away, especially before lunch or end of day, so colleagues aren’t blocked waiting on locked elements.
Sync in smaller, more frequent increments rather than one large batch at day’s end.
Pro Tip: Set a team-wide “sync and relinquish” checkpoint at a fixed time, like 12:30 PM, so nobody holds a workset hostage over lunch without realizing it.
How Do You Keep a Cloud Model Running Fast?
Model performance in the cloud comes down to a handful of habits, and most teams that struggle are skipping at least one of them.
Link other Revit models using the External Resource option, not through Desktop Connector, which is a documented source of slow opens and sync delays.
Open only the worksets you actually need for the task at hand instead of loading the entire model every session.
Purge unused families, materials, and line styles on a regular schedule, since bloated models slow every operation from opening to syncing.
Close and restart Revit periodically during long sessions rather than leaving one instance open for days, which lets memory and cache issues accumulate.
Keep every team member on the same Revit build to avoid version-mismatch errors during sync.
Autodesk recommends a minimum symmetrical bandwidth of roughly 5 Mbps per machine as a baseline for cloud worksharing, and that number climbs fast once you have a dozen people syncing concurrently on the same project. It’s also worth periodically checking your Revit Accelerator and PacCache activity, since a healthy local cache and consistent builds across the team materially reduce the sync errors that get mistaken for model corruption.
Why Is My Model Greyed Out (And Other Common Fixes)?
Most cloud worksharing problems trace back to one of three causes, and none of them require IT escalation on the first try.
Greyed-out or unopenable cloud model. This usually means a permission mismatch or an interrupted sync. Confirm your Autodesk Docs access level first, then try reopening from the Revit Home screen rather than a saved shortcut.
Sync conflicts between users. Reload Latest before syncing to catch conflicts early. If a workset appears locked by someone who’s no longer active, a project admin can use Force Relinquish, but treat that as a last resort since it can undo unsaved work for the original user.
Corrupted or bloated local cache. Clear the local cache and create a fresh local copy. If problems persist across multiple users after a cache clear, that’s the point to escalate to Autodesk support rather than keep troubleshooting solo.
What Do Autodesk Certified Trainers Tell Teams Adopting Cloud Worksharing?
Teams that adopt cloud worksharing smoothly almost always run a short onboarding pass before opening a live project model. At S15studio, that typically means walking through the worksharing fundamentals as a group, confirming everyone’s BIM Collaborate Pro access works, and doing a dry run in a throwaway test model before anyone touches the real project.
Two habits separate teams that adopt quickly from teams that fight the tool for months: creating a fresh local copy every single morning without exception, and putting publish schedules on the calendar instead of publishing reactively whenever someone remembers.
A few micro-exercises build muscle memory fast. Have new users practice synchronizing with intentionally small changes first, then relinquishing a workset on command, then recovering from a simulated Reload Latest conflict in the test model. Twenty minutes of that beats an hour of reading documentation.
Is Your Model Data Safe in the Cloud?
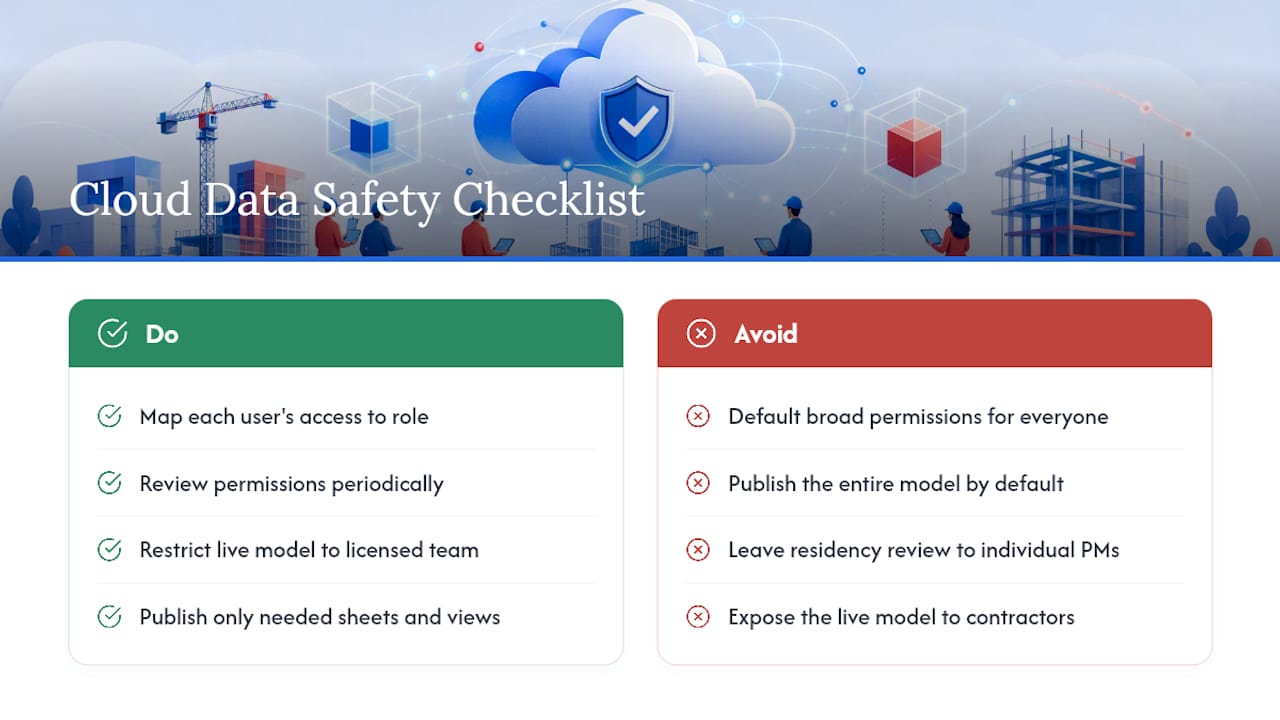
Cloud worksharing moves your project data off a server you physically control and onto Autodesk’s cloud infrastructure, which is a real shift in how firms need to think about data governance. The upside is that Autodesk Docs applies consistent access controls and audit trails across every file, something that’s genuinely hard to replicate on an in-house server managed inconsistently across offices.
Permissions are the first line of defense, and they deserve more attention than most teams give them. Every collaborator’s access level, editor or viewer, should map to their actual role on the project rather than defaulting everyone to the broadest permission available. Project admins should review the permissions list periodically, not just at project kickoff, since team composition shifts as consultants roll on and off a job.
Treat the live cloud model and the published snapshots as two different trust zones. The live model holds your full working data and should stay restricted to Revit-licensed project team members. Published views, by contrast, are what you deliberately expose to clients and contractors, so think carefully about which sheets and views actually need to go into that snapshot rather than publishing the entire model by default. A partner resource on secure design sharing covers similar ground for firms handling sensitive client deliverables outside Revit specifically.
Data residency and retention policies matter for firms working under contractual or regulatory requirements, and those terms live in Autodesk’s own service agreements rather than in Revit’s interface. It’s worth having your IT lead or contracts team review those terms once, at the account level, rather than leaving it to individual project managers to figure out project by project.
How Does Cloud Worksharing Connect to Other Autodesk Tools?
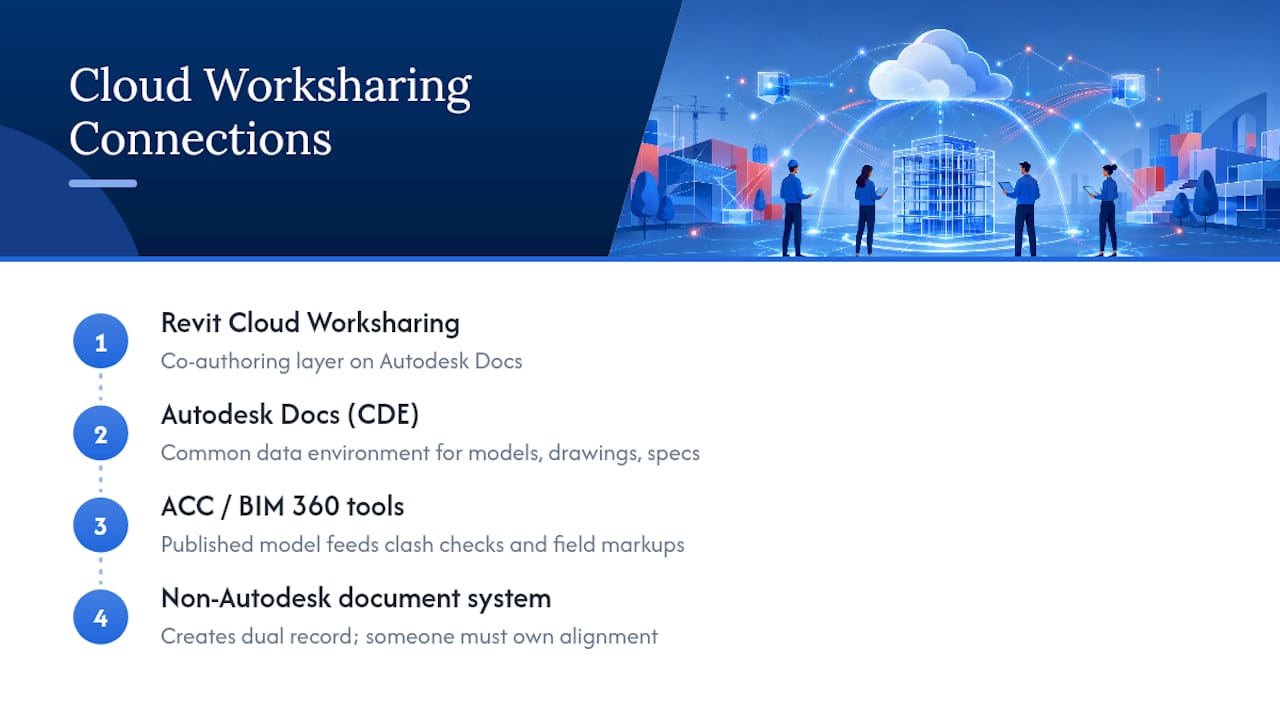
Revit Cloud Worksharing doesn’t operate in isolation. It’s the co-authoring layer sitting on top of Autodesk Docs, which functions as the common data environment for the entire project, not just the Revit model. Drawings, specifications, and coordination issues can live alongside the model in the same project structure.
That matters most once you bring in Autodesk Construction Cloud tools for clash detection and field coordination. A published Revit model feeds directly into those coordination workflows, so the discipline you build synchronizing and publishing your Revit model pays off again when it’s time to run clash checks or issue field markups. If your team is already thinking about coordination beyond authoring, it’s worth pairing this guide with a clash detection workflow built around the same published-model logic.
BIM 360 and Autodesk Construction Cloud share the same underlying document management as Autodesk Docs, which means permissions and folder structures you set up for Revit cloud worksharing largely carry over rather than requiring a second configuration pass. This is one of the more underappreciated advantages of committing to the Autodesk Docs ecosystem instead of mixing cloud worksharing with a separate third-party file-sharing tool for the rest of the project.
Where this integration gets messy is when a firm layers a non-Autodesk document control system on top for contractual reasons. It’s not incompatible, but it does mean two systems of record instead of one, and someone on the team needs to own keeping them aligned. A construction document control guide walks through that governance problem in more general terms if your firm is navigating a dual-system setup.
How Do You Track Changes and Recover Old Versions?
Every Synchronize event and every Publish creates a version entry, so cloud worksharing gives you a more granular history than most traditional central-model workflows ever did. That history lives in Autodesk Docs, separate from any manual “Save As” naming convention your office might have used in the past.
Publish snapshots are the more useful recovery point in practice, since each one captures a complete, labeled state of the selected sheets and views at a specific moment. If a client asks what a floor plan looked like three publishes ago, that snapshot is sitting in Autodesk Docs waiting to be pulled up, no digging through a shared drive full of files named “final_v3_reallyfinal.”
The live model’s sync history is more granular but less curated. It’s a running log of every synchronize event from every team member, which is useful for diagnosing when a specific change entered the model, but it’s not really designed as a client-facing version archive the way published snapshots are.
One practical implication: don’t rely on the sync log as your only version control strategy. Build a publish cadence, whether that’s weekly or tied to project milestones, specifically because those published versions become your durable, easy-to-navigate record. The insight worth internalizing here is to separate your internal sync rhythm from your external publish schedule deliberately, since treating them as the same thing is how teams end up with either too few recovery points or an unmanageable flood of client-facing versions.
What Hardware and Network Setup Actually Works?
Cloud worksharing shifts the performance bottleneck away from your server room and onto two things instead: each workstation’s local processing power and the office’s internet connection.
On the hardware side, Revit’s own recommendations for local processing still apply, since the local cache and rendering work happen on the machine in front of you regardless of where the central model lives. A solid multi-core processor, at least 16 GB of RAM for typical projects (more for large, heavily linked models), and a solid-state drive for the local cache all still matter as much as they did with a traditional central file.
Network bandwidth is where cloud worksharing introduces a new variable. Autodesk’s baseline guidance calls for roughly 5 Mbps of symmetrical bandwidth per machine, and that figure is a floor, not a comfortable target, once you have several people syncing large models at the same time. Offices running a dozen or more concurrent Revit users on a single shared connection should budget bandwidth accordingly rather than assuming the office’s general internet plan will hold up under project load.
Wired connections beat WiFi for anyone doing heavy cloud worksharing work, particularly in older office buildings where WiFi congestion during busy hours is common. It’s a small, unglamorous fix, but it eliminates a surprising number of “random” sync failures that turn out to be dropped packets rather than a Revit problem at all.
Publisher Perspective: When Cloud Worksharing Actually Pays Off
The tool itself isn’t what determines whether cloud worksharing succeeds. It’s whether the team adopts consistent habits around it, daily local copies, scheduled publishes, disciplined relinquishing, before the pressure of a live deadline forces bad shortcuts. Firms that train on these procedures before go-live consistently adopt faster than firms that learn by trial and error mid-project. The tool is only ever as good as the discipline built around it.
— Steve
Get Your Team Fluent in Revit Cloud Worksharing Faster
Reading through sync commands and permission checklists gets you most of the way there, but the mistakes that actually cost project time, a botched Force Relinquish, a bloated cache nobody noticed for weeks, tend to show up the first time real deadline pressure hits. S15studio built its Revit Worksharing course specifically around that gap: hands-on practice with synchronize, publish, and relinquish workflows in a live-style project environment, taught by an Autodesk Certified Trainer, so your team makes those mistakes in a training model instead of a client deliverable.

The course walks through the exact setup and daily-workflow sequence covered in this guide, then goes further into worksharing governance for teams running multiple concurrent projects. If your team is still building foundational Revit skills before tackling cloud worksharing, the beginner to intermediate course is the better starting point. Either way, check the course pages for current start dates and get your team on a structured path instead of learning worksharing habits the expensive way.
Sources
Recommended
Comments