Revit Drafting View Explained for Design Professionals
- Steve Fagan

- 1 day ago
- 8 min read

A Revit Drafting View is a standalone 2D workspace that exists completely independent of the building model, used to create detailed drawings that do not interact with 3D geometry. Architects and architectural technicians rely on this view type to document standard construction details, fire-rated partition assemblies, and custom notes that would clutter or complicate the model itself. Understanding the revit drafting view explained concept is the difference between a documentation workflow that scales and one that breaks under project pressure. This article covers what drafting views are, how to create them, how they compare to other Revit view types, and the best practices that separate efficient teams from slow ones.
What is a Revit drafting view?
A Revit Drafting View is defined as a standalone 2D-only view not connected to the building model, used for detailing where no 3D geometric underlay is needed. That independence is the defining feature. You are drawing on a blank canvas, not cutting through a model.
Drafting views support 2D tools including detail lines, filled regions, detail components, text, and dimensions. They exclude model-based elements entirely. This makes them the right choice for details that are generic or standard across multiple projects, such as a typical wall base condition or a fire-rated partition assembly that does not change from job to job.

The view type is sometimes called a “2D detail view” in informal practice, but the correct Autodesk Revit term is Drafting View. Using the right terminology matters when you are searching Revit’s help documentation or communicating with other BIM professionals. Both terms refer to the same thing, and you will see both in professional practice.
Manual referencing is required to connect a drafting view to the rest of your documentation. Without it, the view floats in the project browser with no link to a plan, section, or callout. That referencing step is what keeps your documentation set coherent and professional.
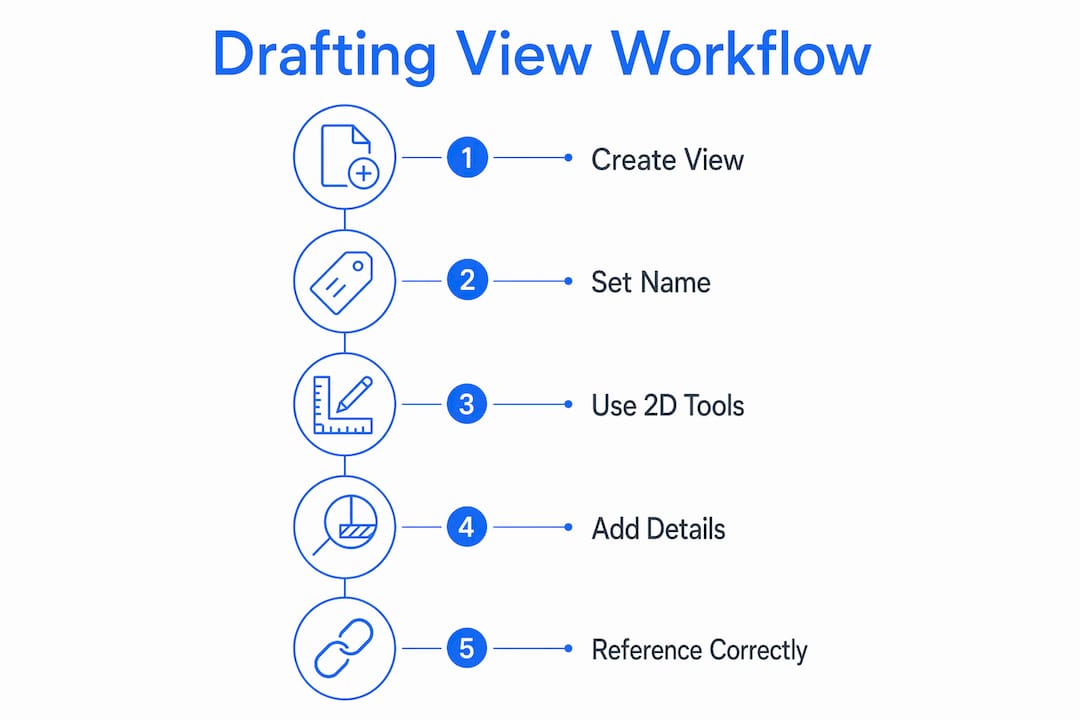
How to create drafting views in Revit
Creating a drafting view follows a consistent, repeatable process. Access the command via the View tab on the ribbon, then select Drafting View from the Create panel. Revit immediately prompts you to name the view and set its scale.
Naming and scale setup
Naming conventions matter more than most architects realize. A clear name like “Typ. Wall Base Detail 1:10” tells every team member exactly what the view contains and at what scale. Vague names like “Detail 1” create confusion and slow down sheet assembly. Set your scale at creation, but know that scale is adjustable at any point after creation without redrawing any geometry. That flexibility means you can adapt a detail originally drawn at 1:10 to a 1:5 presentation on a different sheet without starting over.
Building the detail
Once the view is open, you work exclusively with 2D drafting tools. Detail lines define the geometry. Filled regions represent materials like concrete, insulation, or timber. Detail components are pre-built 2D symbols for common elements such as bolts, welds, or blocking. Annotations, dimensions, and text complete the drawing.
Pro Tip: Build your detail in layers. Start with the overall outline using detail lines, add filled regions for materials, then place detail components, and finish with annotation. This order mirrors how a hand drafter would work and keeps the view organized.
A getting started with Revit workflow always includes setting up a consistent view naming system before creating any drafting views. That upfront investment saves hours during sheet assembly.
How do drafting views differ from legend and model-based views?
Choosing the wrong view type is one of the most common mistakes in Revit documentation. Each view type serves a specific purpose, and mixing them up creates problems that are hard to fix mid-project.
View type | Linked to model | Multiple sheets | Auto-referencing |
Drafting View | No | No | Manual only |
Legend View | No | Yes | No |
Model-based Detail | Yes | No | Yes (dynamic) |
Drafting views are 2D and standalone. They cannot appear on multiple sheets simultaneously. If you need the same detail on Sheet A3 and Sheet A7, a drafting view will not work for that purpose.
Legend views solve the multi-sheet problem. They do not support automatic referencing or tagging like drafting views, but they allow the same content to appear on as many sheets as needed. Door hardware schedules, material legends, and general notes are natural fits for legend views.
Model-based detail views cut through the actual 3D model and update dynamically when the model changes. A wall section drawn as a model-based detail will reflect any geometry change made to that wall. The trade-off is that they are project-specific and cannot be reused across different jobs without significant rework.
The practical rule is straightforward. Use drafting views for standard or generic details that do not change with the model. Use legend views when the same content must appear on multiple sheets. Use model-based details when accuracy tied to the actual model geometry is the priority.
Best practices for managing drafting views
Organized drafting views are the foundation of a documentation set that holds up under review. Poorly managed views create referencing errors, inconsistent line weights, and wasted time during construction administration.
Referencing drafting views correctly
The Reference Other View tool is the correct method for linking a callout on a plan or section to a drafting view. When you place a callout and toggle on “Reference Other View,” Revit links the callout tag to the sheet and detail number of the drafting view. This keeps your documentation coherent. Tags on plans point correctly to details on sheets, and the connection updates if you move the detail to a different sheet.
Without this step, callouts on plans become orphaned references. Contractors and reviewers cannot trace a callout back to its detail, which creates real problems during construction.
Building a reusable detail library
Successful architecture firms build reusable drafting view libraries to ensure consistency and reduce drafting time across projects. The mechanism is a dedicated Revit “Detailing Source File” that stores all standard drafting views. When starting a new project, you use the Insert View from File command to pull those standard details directly into the current project file. This approach saves hours of drafting and guarantees that every project starts with the same baseline detail quality.
Create a master Revit file dedicated solely to standard details.
Organize views in the project browser by category (foundations, walls, roofs, connections).
Update the source file whenever a detail is revised or improved.
Use Insert View from File at project start to populate the new file with current standards.
Review imported details for scale and annotation consistency before placing them on sheets.
Pro Tip: Version-control your detailing source file with a clear naming convention that includes the date of the last update, such as “Detail Library 2026-03.” This prevents teams from importing outdated details into live projects.
Managing CAD imports
Many firms carry legacy CAD details from AutoCAD into Revit drafting views. Importing a DWG file into a drafting view is a valid starting point, but leaving it as an Import Instance is a mistake. CAD Import Instances create clutter, behave unpredictably during plotting, and cannot be edited with Revit’s native tools. The correct step is to fully explode the import, converting it to native Revit elements. That conversion enables line style management, text editing, and predictable plotting output. If you are moving from AutoCAD to Revit, this conversion step is one of the first skills to master.
What are the most common drafting view mistakes?
Even experienced Revit users make predictable errors with drafting views. Knowing them in advance saves significant rework.
Leaving CAD imports as Import Instances. Always fully explode imported DWG files and convert them to native Revit elements for clean plotting and editing.
Ignoring the single-sheet limitation. A drafting view can only appear on one sheet at a time. Trying to place the same drafting view on two sheets will fail. Use a legend view instead.
Skipping the Reference Other View step. Callouts without proper referencing produce orphaned tags. Every drafting view placed on a sheet must be linked back to its callout using Reference Other View.
Inconsistent naming. Views named “Detail 1,” “Detail 2,” and “New Detail” are impossible to manage at scale. Adopt a naming convention on day one and enforce it across the team.
Not maintaining a detail library. Redrawing standard details from scratch on every project wastes time and introduces variation. A dedicated source file with standardized drafting views eliminates both problems.
A properly referenced drafting view is not a shortcut or a workaround. It is a legitimate, professional documentation tool. The firms that treat it that way produce better documentation sets faster than those who insist on model-based details for every drawing.
The single-sheet limitation catches architects off guard most often during sheet assembly. The fix is simple: plan your view types before you start drawing. Decide at the outset whether a detail needs to appear on one sheet or several, and choose the view type accordingly.
Key takeaways
A Revit Drafting View is the correct tool for standard, non-model-based details, and its value depends entirely on disciplined naming, referencing, and library management.
Point | Details |
Drafting views are standalone 2D views | They have no link to the 3D model and must be manually referenced to callouts. |
Scale is adjustable after creation | Change the scale at any time without redrawing geometry to suit different sheet requirements. |
Single-sheet limitation | Each drafting view can appear on only one sheet; use legend views for multi-sheet placement. |
Reference Other View is mandatory | Always link callouts to drafting views using this tool to maintain documentation integrity. |
Build a reusable detail library | A dedicated detailing source file saves drafting time and ensures consistency across projects. |
Why drafting views deserve more respect than they get
Architects often treat drafting views as a fallback, something you use when the model cannot produce the drawing you need. That framing is wrong, and it leads to poor decisions about when and how to use them.
The reality is that a well-managed drafting view library is one of the most productive assets a firm can build. I have seen teams cut their detail production time significantly by investing in a solid source file with standardized details. The first project takes longer to set up. Every project after that is faster.
The referencing discipline is where most teams fall short. Skipping the Reference Other View step feels like a time-saver in the moment. It creates confusion during construction administration when contractors cannot trace a callout to its detail. That confusion costs far more time than the referencing step would have taken.
My honest advice: treat your drafting view library the same way you treat your Revit template. Update it regularly, enforce naming standards, and make it part of your project startup checklist. The Revit worksharing environment adds another layer of complexity, but the core discipline is the same. Clean views, clear names, and proper references produce documentation sets that hold up under scrutiny.
— Steve
S15studio’s Revit training covers drafting views in depth
Drafting views are one of those topics that make much more sense when you see them built from scratch in a real project environment. S15studio’s courses cover everything from beginner Revit setup through advanced detailing workflows, including how to create, reference, and manage drafting views across a full documentation set.
The complete Revit and AutoCAD training program at S15studio is built by Autodesk Certified Trainer Steve Fagan and designed specifically for architects and architectural technicians who need practical, project-based skills. Whether you are building your first detail library or preparing for Autodesk certification, the courses give you the hands-on experience that makes the difference in professional practice.
FAQ
What is a drafting view in Revit?
A drafting view is a standalone 2D view in Revit that is not connected to the building model. It is used to create construction details and drawings that do not require model geometry as an underlay.
Can a drafting view appear on multiple sheets?
No. A drafting view can only be placed on one sheet at a time. Use a legend view when the same detail needs to appear on multiple sheets across a drawing set.
How do you link a drafting view to a callout?
Use the Reference Other View option when placing a callout on a plan or section. This links the callout tag directly to the sheet and detail number of the drafting view.
Can you change the scale of a drafting view after creation?
Yes. The scale property of a drafting view is not locked. You can change it at any time after creation without redrawing any of the geometry in the view.
What is the best way to reuse drafting views across projects?
Maintain a dedicated Revit detailing source file that stores all standard drafting views. Use the Insert View from File command to pull those details into new projects, saving drafting time and maintaining consistency.
Recommended
Comments