
Revit Assembly Codes Explained for BIM Professionals
- Steve Fagan

- Jul 9
- 8 min read

Revit assembly codes are built-in classification parameters that reference the UniFormat system developed by the Construction Specifications Institute (CSI), enabling structured identification of building components across every phase of a BIM project. Understanding how these codes work is not optional for serious BIM practice. They drive scheduling, cost estimation, specifications, COBie deliverables, and IFC exports. Architects and BIM professionals who skip this step create data gaps that surface at the worst possible time: during handover, compliance checking, or facility management. This guide covers the code structure, management workflow, common mistakes, and the downstream benefits that make proper classification worth the effort.
What are Revit assembly codes and how do they work?
The Assembly Code parameter is built into every Revit family and references the UniFormat classification system. UniFormat organizes building elements by functional location, not by material or trade. A concrete wall and a steel wall both fall under the same UniFormat division because they serve the same building function. That logic makes UniFormat ideal for early-stage cost planning and specification writing.
CSI created UniFormat to give the construction industry a shared language for classifying building systems. The code structure uses a hierarchical alphanumeric format. The letter prefix identifies the major division (for example, “B” for Shell), followed by numbers that drill down to specific element types. A code like B2010 refers to exterior walls, while B2010.10 narrows it further to a specific wall type.

Each Revit family stores the Assembly Code as a type parameter. That means the code applies to every instance of that family type placed in the model. You can also assign or override codes at the instance level when a specific element needs a different classification. This flexibility supports projects where the same family type serves multiple functional roles.
Pro Tip: Treat the Assembly Code as part of the family template, not an afterthought. Setting it during family creation means every placed instance carries correct classification from day one.
How do you access and manage assembly codes in Revit?
Revit stores assembly code settings in a dedicated dialog, not buried inside family properties. The path is straightforward once you know where to look.
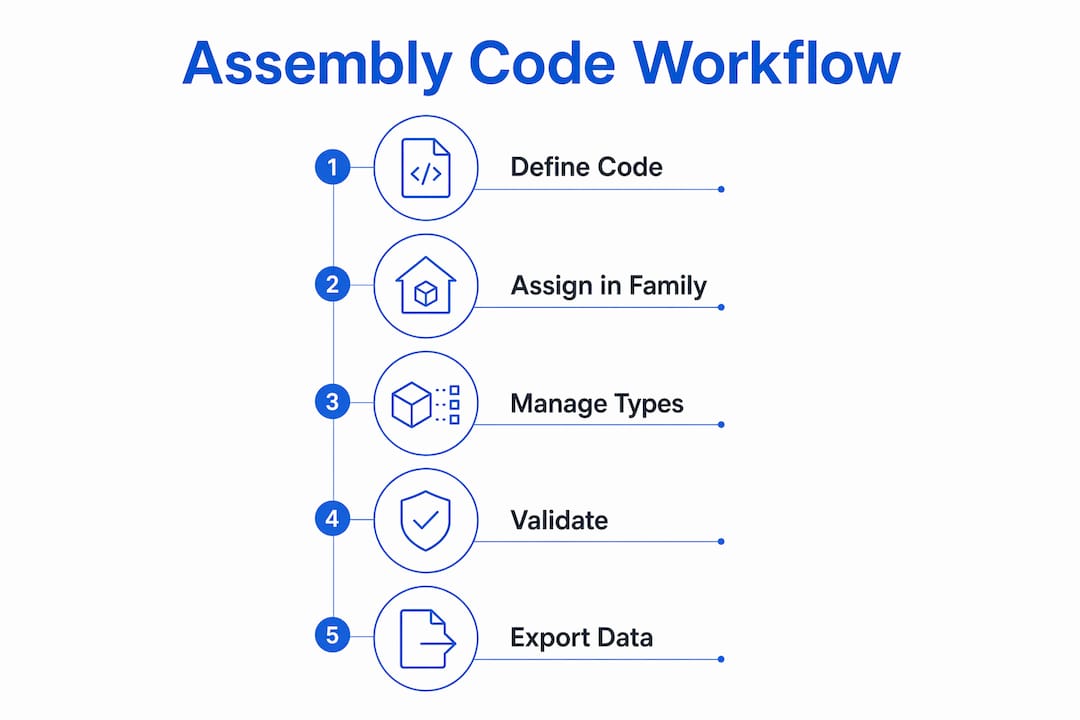
Open the Manage tab on the ribbon.
Click Additional Settings in the Settings panel.
Select Assembly Codes from the dropdown.
In the dialog, click Browse to link the classification text file (.txt) that contains the UniFormat hierarchy.
Once linked, the full code tree appears and you can assign codes to families or types directly.
The classification file is the critical dependency here. Revit requires an external .txt file to populate the Assembly Codes dialog. Without it, the dialog shows a warning and no codes are available for selection. The most common file is UniformatClassifications_2010.txt, typically located in the ProgramData\Autodesk folder path on your machine. If the file is missing or the path has changed, Revit displays a warning icon in the dialog. Restoring the correct file path resolves the issue immediately.
Editing assembly codes at the type level happens inside the Family Editor or through the Type Properties dialog in the project environment. Select any element, open its Type Properties, and locate the Assembly Code field under the Identity Data group. Click the field to open the classification browser and select the correct code from the hierarchy.
Pro Tip: If your firm uses a custom classification file, store it on a shared network location and point all team members to the same path. This prevents mismatches when files are opened on different machines.
How do UniFormat, OmniClass, and other standards coexist in Revit?
Revit’s native Assembly Code field supports one classification standard at a time, and UniFormat is the default. That works for most domestic projects. Complex projects, especially those with international clients or government contracts, often require OmniClass or other standards alongside UniFormat.
OmniClass is a broader classification system that covers the full construction industry, including products, work results, and project phases. UniFormat focuses on functional elements. The two systems are complementary, not competing. A project might use UniFormat for cost planning and OmniClass for facility management handover.
Standard | Focus area | Typical use case |
UniFormat | Functional building elements | Cost estimation, specifications |
OmniClass | Full construction taxonomy | Facility management, procurement |
IFC classifications | Open BIM interoperability | Cross-platform data exchange |
Revit’s single Assembly Code field creates a practical problem when you need to track multiple standards simultaneously. The Autodesk Classification Manager tool solves this by allowing multiple classification standards to be tracked and managed within a single Revit project. It bypasses the single-field limitation and gives BIM managers a way to maintain UniFormat and OmniClass codes on the same elements without workarounds or custom shared parameters.
For most architecture firms working on standard commercial or residential projects, UniFormat alone covers the requirement. Firms delivering to government clients or producing COBie data packages should evaluate whether the Autodesk Classification Manager fits their workflow.
What are the most common mistakes with assembly codes?
The single most damaging mistake is confusing Revit “Assemblies” with the “Assembly Code” parameter. These are entirely different features. Revit Assemblies group model elements together for documentation purposes, such as creating shop drawings for a precast panel. The Assembly Code parameter is classification metadata attached to a family type. Mixing up the two leads to misapplied workflows and wasted time.
Other common pitfalls include:
Leaving Assembly Code fields blank. Blank codes produce incomplete schedules and break downstream exports like COBie and IFC.
Assigning codes inconsistently across family types. A door family with three types should carry consistent codes unless the types genuinely serve different functional roles.
Editing codes only in the project environment. Changes made at the project level do not write back to the source family file. The next time that family is loaded, the code reverts.
Ignoring bulk management for large libraries. Manual editing of hundreds or thousands of families is error-prone. Third-party tools like CTC Software’s Revit Family Processor enable bulk editing of assembly codes across entire family libraries, which is the accepted industry practice for large BIM operations.
Embedding classification metadata like UniFormat codes is a core requirement for professional BIM object creation. Firms that treat it as optional discover the cost during project closeout, when remediation requires touching every family in the model.
Pro Tip: Run a Revit schedule filtered by blank Assembly Code fields before any major project milestone. It takes minutes and catches gaps before they affect deliverables.
What are the real benefits of correct assembly code usage?
Correct assembly codes produce measurable improvements across multiple project workflows. The benefits compound as the project progresses.
In cost estimation, UniFormat codes allow quantity takeoff tools to automatically sort and group elements by functional category. An estimator working from a well-coded model does not need to manually classify walls, floors, or roofs. The model does it for them.
For specification writing, assembly codes link Revit elements directly to CSI MasterFormat sections through the UniFormat bridge. That connection reduces the manual effort of matching model elements to spec sections. It also reduces errors caused by elements that fall through the cracks during documentation.
COBie deliverables require structured asset data, and assembly codes are a primary data field in COBie exports. A model with complete codes produces a COBie spreadsheet that facility managers can use immediately. A model with blank codes produces a spreadsheet that requires manual remediation before it is usable.
Model hygiene audits that verify assembly code assignment are a prerequisite for reliable automated QA/QC checks. Code checking tools read model metadata and flag non-compliant elements. If the metadata is wrong or missing, the tool produces confident but incorrect results. Verifying codes before running automated checks is not optional; it is the foundation of a trustworthy QA/QC process.
IFC exports also benefit directly. IFC classification properties map to assembly codes during export, giving receiving applications the context they need to interpret model elements correctly. Open BIM workflows depend on this data being present and accurate.
Key Takeaways
Correct assembly codes, assigned at the family level and maintained throughout the project, are the single most effective way to protect the integrity of BIM data from design through handover.
Point | Details |
Assembly codes reference UniFormat | CSI’s UniFormat system is the default standard; codes follow a hierarchical alphanumeric structure. |
External .txt file is required | Revit needs a linked classification file to display codes; a missing file blocks all code selection. |
Assign codes during family creation | Setting codes in the family editor prevents data gaps and avoids costly remediation later. |
Assemblies and Assembly Codes differ | Revit Assemblies group elements for documentation; Assembly Codes are classification metadata. |
Bulk tools prevent errors at scale | Tools like Revit Family Processor handle large libraries efficiently and reduce manual mistakes. |
Why I think most teams underestimate assembly codes
I have reviewed a lot of Revit models over the years, and the pattern is consistent. Teams spend hours perfecting geometry and almost no time on classification metadata. Then they wonder why their COBie export is a mess or why the automated checker keeps flagging elements incorrectly.
The uncomfortable truth is that assembly codes are not a finishing step. They are a foundation. Populating codes during family development prevents the kind of data remediation that eats project budgets at handover. I have seen firms spend days manually correcting codes on models that were otherwise complete. That work should have taken hours at the start.
The confusion between Revit Assemblies and Assembly Codes trips up even experienced users. I always address this distinction early in any training session because the terminology is genuinely misleading. Once the difference is clear, the rest of the workflow makes sense.
My advice is simple: build a firm standard for assembly codes, embed it in your family templates, and audit it at every project milestone. The Revit blog resources at S15studio cover this and related BIM workflows in depth if you want to go further. Classification metadata is not glamorous work, but it is what separates a model that delivers value from one that just looks good on screen.
— Steve
Level up your Revit skills with S15studio
Assembly codes are one piece of a much larger BIM competency picture. Mastering them alongside worksharing, family creation, and documentation workflows is what separates a capable Revit user from a confident one.

S15studio offers structured Revit training from beginner introduction courses through to the Revit Master Class, covering classification workflows, family best practices, and professional BIM documentation. Every course is built by Autodesk Certified Trainer Steve Fagan and designed around real project scenarios. If you want to build skills that hold up on live projects, S15studio’s training gives you the foundation and the depth to do it.
FAQ
What is a Revit assembly code?
A Revit assembly code is a built-in type parameter that references the UniFormat classification system developed by CSI. It classifies building elements by functional category to support scheduling, cost estimation, and BIM deliverables.
Where do you find assembly codes in Revit?
Assembly codes are accessed through the Manage tab, under Additional Settings, then Assembly Codes. Revit requires a linked classification .txt file for codes to appear in the dialog.
What happens if the classification file is missing?
Revit displays a warning icon in the Assembly Codes dialog and blocks code selection until the correct file path is restored. The standard file is UniformatClassifications_2010.txt, located in the Autodesk ProgramData folder.
What is the difference between Revit Assemblies and Assembly Codes?
Revit Assemblies group model elements together for documentation purposes such as shop drawings. Assembly Codes are classification metadata parameters that identify element types using a standard like UniFormat. They are unrelated features.
How do you manage assembly codes across a large family library?
Bulk editing tools like CTC Software’s Revit Family Processor allow batch assignment of assembly codes across hundreds or thousands of families. Manual editing at that scale is inefficient and introduces errors.
Recommended
Comments