
What Is a Revit Detail Component? A Guide for Architects


A Revit detail component is a 2D view-specific family that architects place in detail, section, or drafting views to add standardized, non-model information to construction documents. These elements are not part of the 3D building model. They exist purely to communicate construction intent through precise, repeatable graphics that complement what the model cannot show at a working drawing scale.
Understanding Revit detail components separates architects who produce clean, consistent documentation from those who spend hours manually redrawing the same linework on every project. The Revit content library organizes these families by industry standards including CSI and Omniclass, giving design professionals a structured starting point for every detail.
What is a Revit detail component, and how does it work?
A Revit detail component is defined as a 2D family composed of lines, arcs, filled regions, and masking regions grouped into a single reusable element. Revit processes it as one element, not as a collection of individual lines. That distinction matters because it reduces file size, speeds up editing, and makes the component schedulable, taggable, and keyed with a keynote.

Detail components live only in views. They appear in drafting views, detail views, sections, and elevations, but they do not exist in the 3D model space. This view-specific behavior is the foundation of the Revit detail component definition: graphical precision where the model stops communicating.
The Revit library ships with over 500 pre-installed generic components organized by CSI and Omniclass categories. That depth means most standard construction assemblies already have a starting family. Architects can load, modify, or build new families to match office standards or project-specific requirements.
What are the types of Revit detail components?
Two primary types exist: standard detail components and repeating detail components. Each serves a different documentation need.
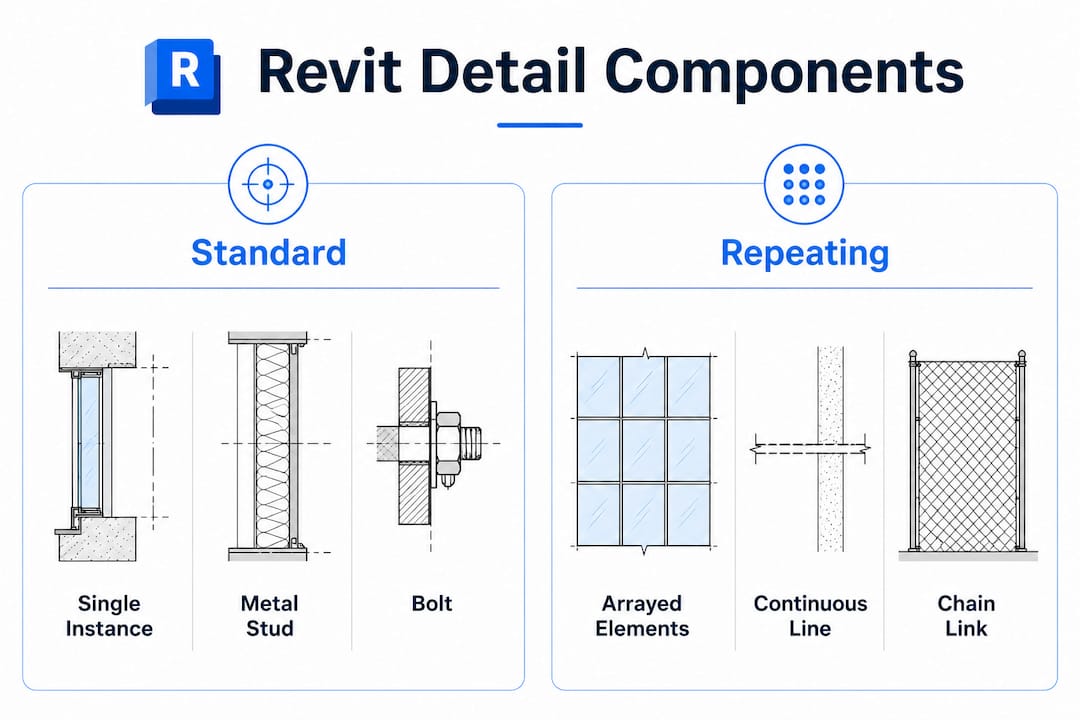
Standard detail components are individual family instances placed one at a time in a view. A single metal stud, a bolt, a weep screed, or a flashing termination bar are all examples. Each instance can carry type parameters, allowing one family to represent multiple sizes or configurations through type variations.
Repeating detail components create an array of a selected detail component along a line at user-defined intervals. Repeating detail components are the correct tool for metal stud layouts, brick coursing, insulation batts, and roof purlins. The spacing is parametric, so changing the interval updates the entire array instantly.
Key properties shared by both types include:
Parametric flexibility: Type parameters control size, spacing, and graphic behavior without rebuilding the family.
Mirroring: Components mirror correctly, preserving graphic intent in reflected or opposing conditions.
Type variations: One family file can contain multiple types, reducing the number of families an office needs to manage.
View-specific visibility: Components appear only in the views where they are placed, keeping the 3D model clean.
Pro Tip: Build type catalogs into your standard detail component families. A single insulation family with types for 2-inch, 3.5-inch, and 5.5-inch widths is far easier to manage than three separate families.
How to use Revit detail components in architectural projects
Placing a detail component follows a consistent workflow that every architect should know by memory. The process is faster than manual drafting and produces documentation that is easier to edit, tag, and schedule.
Load the family. Go to the Insert tab and select Load Family. Navigate to the Detail Items folder in the Revit content library. Select the family that matches your construction condition and click Open.
Open the correct view. Detail components only place correctly in 2D views: drafting views, detail views, or callout views. Open the view where the component belongs before placing it.
Place the component. Go to the Annotate tab, then the Detail panel, and select Detail Component. The component appears in the Type Selector. Click to place it in the view.
Adjust type and parameters. Use the Properties palette to switch types or modify instance parameters. Rotate, mirror, or scale the component to match the drawing condition.
Tag and keynote. Select the component and use the Tag by Category tool or the Keynote tool from the Annotate tab. Detail components support keynoting in a way that generic detail lines cannot.
Schedule if needed. Add a Detail Item schedule to the project to count and track components across all views. This is particularly useful for hardware, fasteners, or specialty items that need to appear in a material takeoff.
Loading families through the Insert tab and placing them via the Annotate tab gives architects more standardization and file efficiency than building the same condition from scratch with individual lines.
Pro Tip: Create a project-specific detail component library folder and load it into every new project template. This single step eliminates the most common cause of inconsistent office graphics.
How do detail components differ from annotations and 3D components?
This is where many architects get confused, and the confusion leads to documentation errors. Three element types look similar but behave very differently.
Detail components vs. generic annotations
Detail components scale with the model, meaning their physical size in the view changes when the view scale changes. Generic annotations maintain a fixed printed size regardless of view scale. A north arrow stays the same printed size at 1:100 and 1:20. A brick detail component drawn at 1:20 would appear much larger than the same component at 1:100. This distinction determines which family template to use when building custom content.
Detail components vs. 3D building components
3D building components, such as walls, doors, floors, and structural members, exist in model space and appear in every view that cuts through them. Detail components exist only in the view where they are placed. A 3D wall shows its core layers in section automatically. A detail component showing the same wall’s flashing, sealant, and backer rod must be placed manually in that section view.
Element type | Exists in 3D model | Scales with view | Supports keynoting | View-specific |
3D building component | Yes | Yes | Yes | No |
Detail component | No | Yes | Yes | Yes |
Generic annotation | No | No | No | Yes |
Detail line | No | Yes | No | Yes |
The table shows why detail components occupy a unique position. They combine view-specific placement with the ability to carry keynotes and tags, which neither generic annotations nor plain detail lines can do.
What practical benefits do Revit detail components offer?
The benefits of using detail components over manual linework are concrete and measurable. Architects who switch from drawing details with individual lines to placing families report faster editing cycles and more consistent output across a project team.
Key benefits include:
Reduced file size. Replacing manual linework with single-component families can reduce file size by around 25%. Smaller files mean faster open times, faster sync times on workshared projects, and fewer performance issues during production.
Annotation integrity. Keynotes attached to detail components remain accurate even when model geometry changes. A keynote on a detail line has no host and can become orphaned. A keynote on a component stays attached.
Office standard enforcement. When a firm loads components from a shared content library, every team member draws the same condition the same way. Graphic consistency across a set of construction documents signals professionalism to contractors and reviewers.
Hybrid detailing efficiency. A hybrid detailing approach combines 3D model geometry with 2D detail components to produce complete, accurate details without over-modeling. This balance keeps the model lean while the detail view carries the full construction story.
Schedulable metadata. Because detail components are families, they carry type and instance parameters. Those parameters feed schedules, which means a hardware count or fastener list can be generated directly from the model documentation.
My take on getting the most from detail components
My take on getting the most from detail components
Most architects I work with underuse detail components for one reason: they learned Revit by drawing lines, and drawing lines feels faster in the moment. It is not faster over the course of a project.
The keynoting limitation with repeating detail components catches people off guard. Keynotes cannot attach directly to repeating detail components or built-in insulation families. The workaround is to place a small, visually unobtrusive single detail component alongside the repeating element and attach the keynote there. It sounds fussy, but it takes ten seconds and keeps your annotation accurate through every model change.
The deeper opportunity is nested components. Nesting detail components inside 3D model families lets the 2D graphic representation update automatically when the 3D element changes. A door family with a nested sill detail component, for example, will always show the correct sill graphic in section without manual intervention. That is the kind of BIM intelligence that separates a well-built model from a collection of drawings that happen to be in Revit.
Start with the content library, build a firm standard, and treat every manually drawn line as a question: should this be a component instead?
— Steve
Build your Revit skills with S15studio
Knowing what a detail component is and knowing how to use it confidently in a live project are two different things. S15studio’s Revit training courses cover detail components, family creation, and full documentation workflows from the ground up.

The beginner Revit course at S15studio introduces detail components in the context of real architectural drawings, so the concept clicks immediately. Architects ready to go further can move into the intermediate course, which covers parametric family building and office standard setup. Every course is built by Autodesk Certified Trainer Steve Fagan and designed for working design professionals, not students in a classroom.
FAQ
What is a Revit detail component?
A Revit detail component is a 2D view-specific family placed in detail or drafting views to add standardized construction information that the 3D model does not show. It supports keynoting, tagging, and scheduling.
How does a detail component differ from a detail line?
A detail line is a single graphical element with no metadata. A detail component is a family that can carry keynotes, tags, and parameters, making it far more useful for professional documentation.
Can detail components appear in 3D views?
No. Detail components are view-specific and appear only in 2D views such as drafting views, detail views, sections, and elevations. They do not exist in the 3D model.
What is a repeating detail component?
A repeating detail component creates an array of a single detail component along a line at a set interval. Common uses include brick coursing, metal stud layouts, and insulation batt patterns.
Can I attach a keynote to a repeating detail component?
Not directly. The standard workaround is to place a small, separate single detail component near the repeating element and attach the keynote to that host instead.
Key takeaways
Revit detail components are the most efficient and annotation-capable 2D documentation tool in Revit, outperforming manual linework in every measurable category.
Point | Details |
Core definition | Detail components are 2D view-specific families that add standardized, non-model information to construction documents. |
Two main types | Standard detail components place individually; repeating detail components array along a path at set intervals. |
File size advantage | Replacing manual linework with detail component families can reduce file size by around 25%. |
Keynoting capability | Detail components support keynotes and tags; plain detail lines and generic annotations do not. |
Hybrid workflow | Combining 3D model geometry with 2D detail components produces complete details without over-modeling the project. |
Recommended
Comments